Hey guys, in the previous article we set up the Claude Code / Codex environment, which personally changed my life 180 degrees. Today we will continue with a simple but very effective win: one web page that shows everything people say about your business, with sentiment, so your marketing team can react quickly to negative and positive mentions. Only 4 steps! Today you will also use the API of 2 separate products. Isn’t it exciting? We will start with Juicer and Netlify.
What you’ll build: a simple brand monitoring dashboard using the Juicer API, which provides normalized social media data from 15+ platforms including Reddit, LinkedIn, X, TikTok and YouTube. Claude Code or Codex will use that data to analyse sentiment and create the interface, and Netlify will publish the dashboard for your team.
Step 1: Get your free Juicer API key
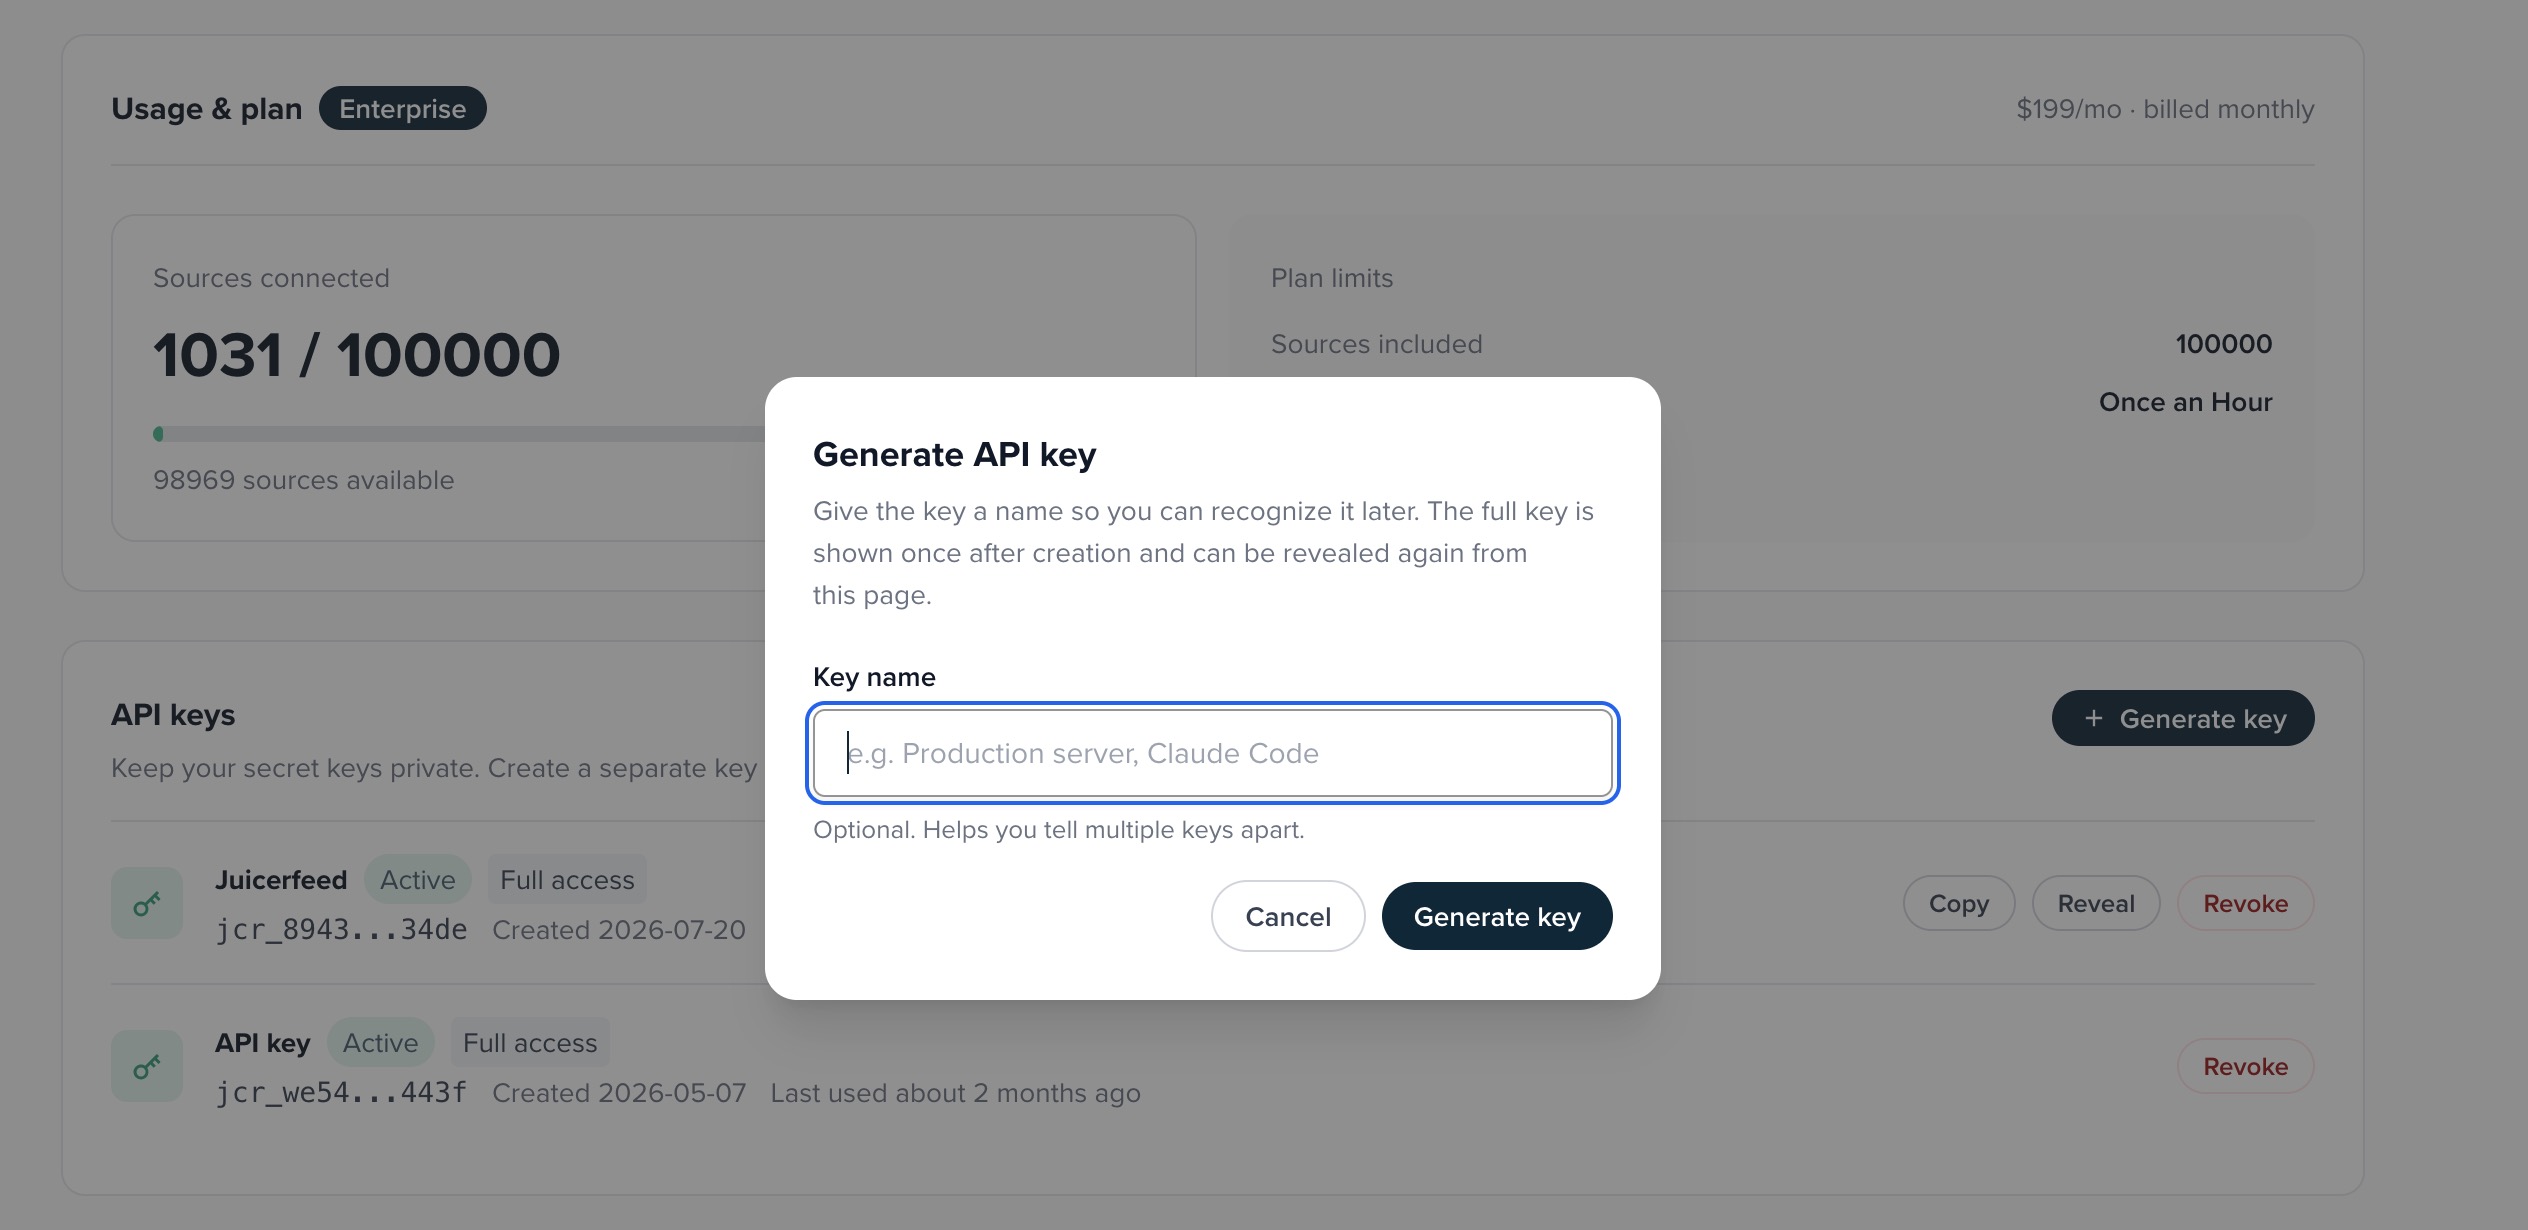
You have 2 options. The first one: with 1 prompt you can create a Juicer API key from the terminal, and confirm your email later:
Get me a Juicer API key for <EMAIL>. The Authentication page at https://developers.juicer.io explains how. Let me know if you need anything from me, and keep the key private.
You should get this message:
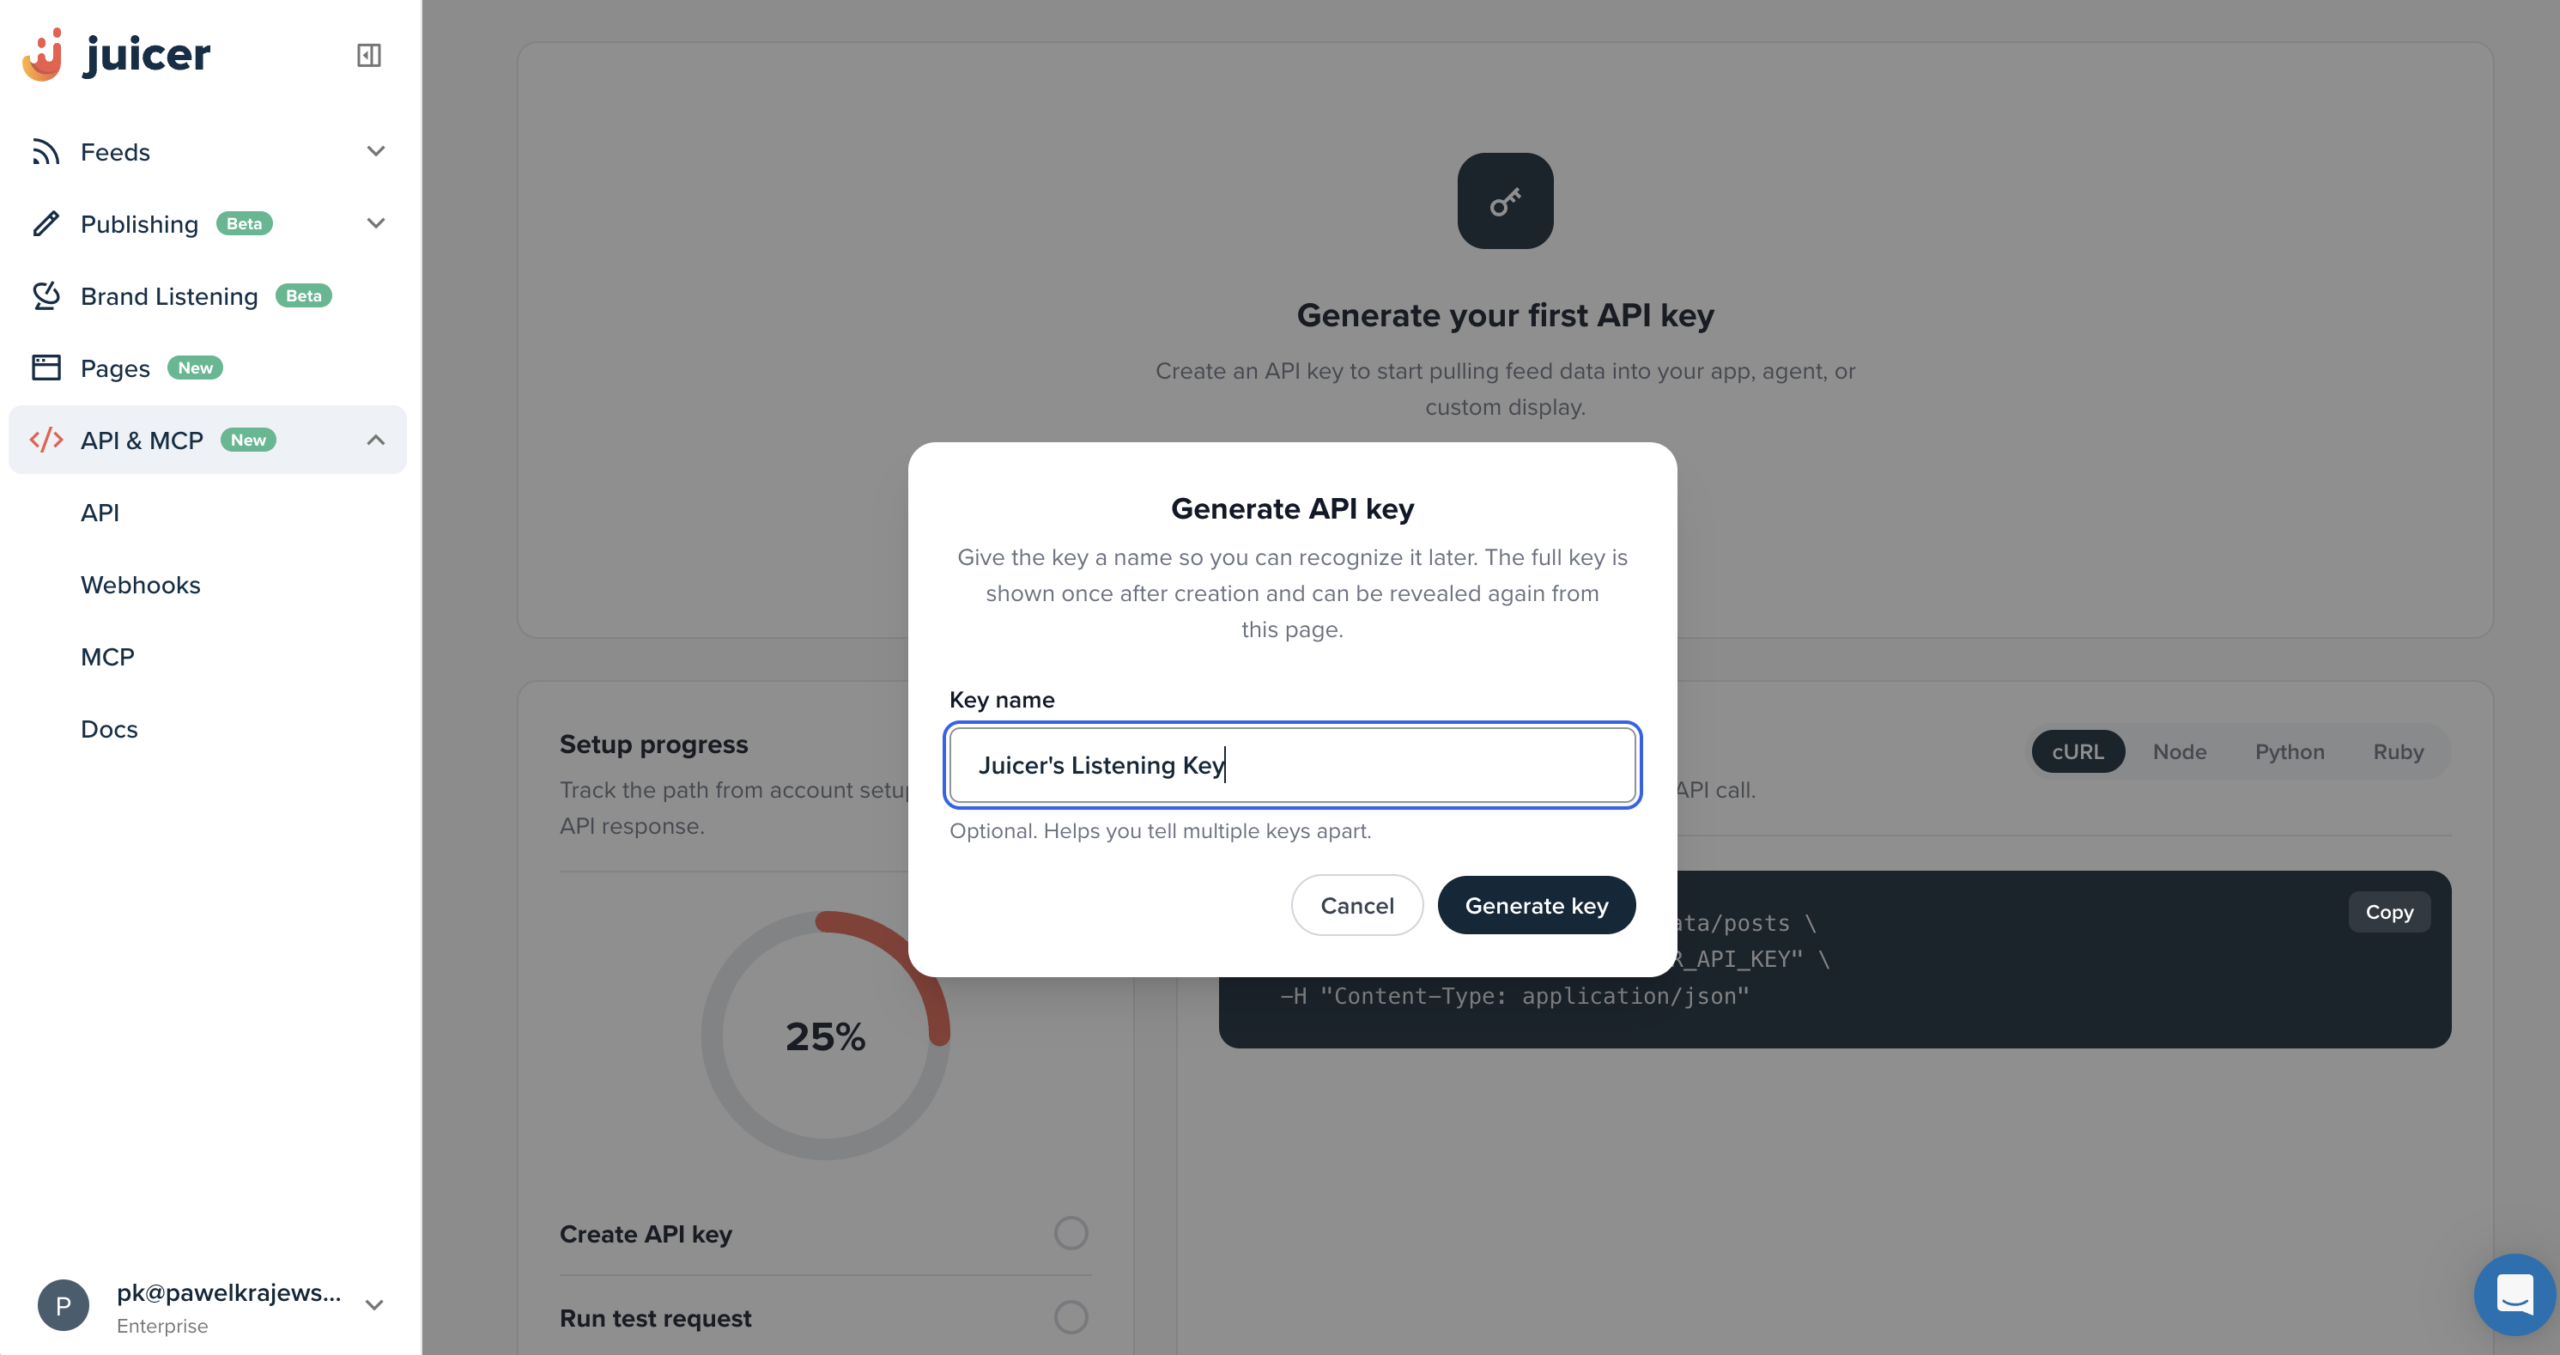
The second one is the traditional way: go to juicer.io, sign in and open the Developer page. Click to create a key. It starts with jcr_.
Remember Step 7 from the last article: never paste it into the terminal. Open your .env file by hand and add:
JUICER_API_KEY=jcr_your-key-here
Step 2: Build your Brand Listening page
Open Terminal, type “claude” (or “codex”) and paste:
My Juicer API key is in .env as JUICER_API_KEY, load it but never print it. Using the Juicer API (docs: developers.juicer.io), find the real posts that mention my brand [BRAND NAME] on Reddit, LinkedIn, X, TikTok and YouTube. For YouTube, search both my brand name and my website address [WEBSITE]. Before you tell me a platform has nothing, try my brand name in quotes, my website, my hashtag and my @handle, and tell me what you tried. Then build one HTML page: every mention as a card with platform, author, date, post text, a sentiment tag (🟢 positive, 🔴 negative, ⚪ neutral) with a one-line reason, and a link to the original post. Add filters by platform and sentiment, and counters at the top. Only real posts from Juicer, never made-up ones, and never put the API key inside the HTML. Open the resulting HTML output in my browser.
Give it a few minutes. Then look at the page, click a few links to check they open the real posts, and ask for changes until you like it (“our brand colors”, “negative ones on top”, “bigger text”).
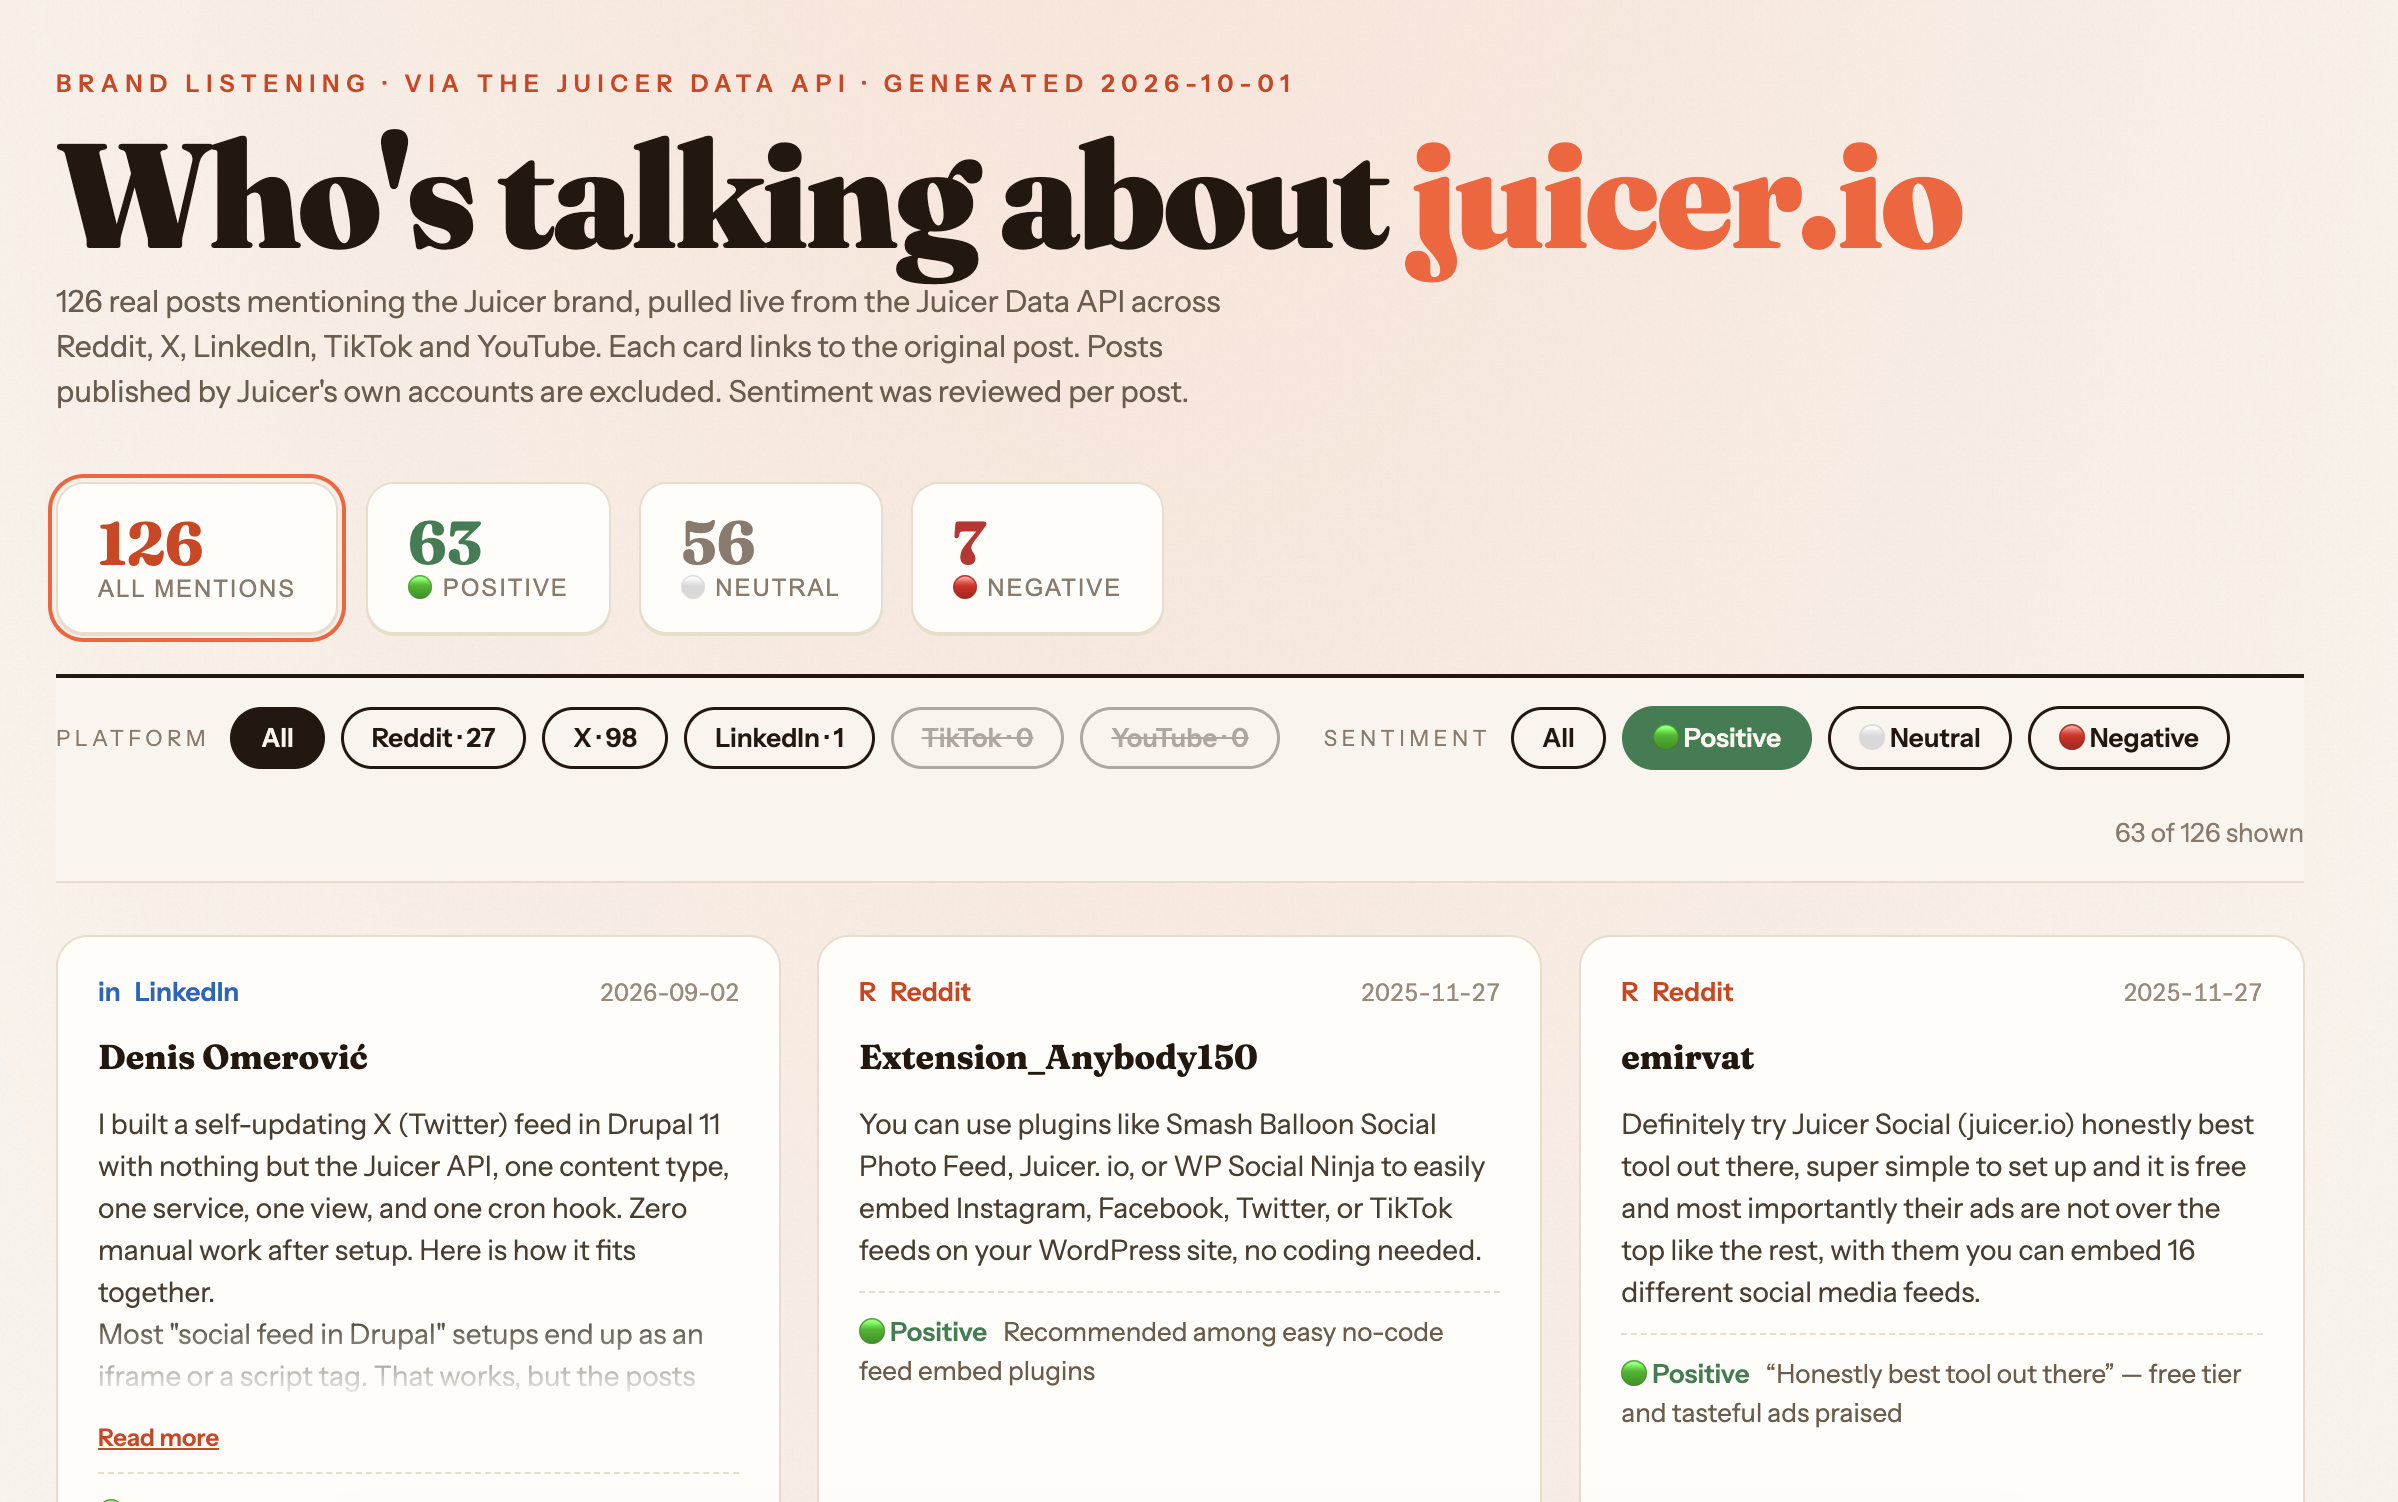
Once finished, you will get the HTML output. This is what I got from Claude:
Step 3: Get your Netlify key
Netlify is a free place to put your page online, so your team can open it with a link.
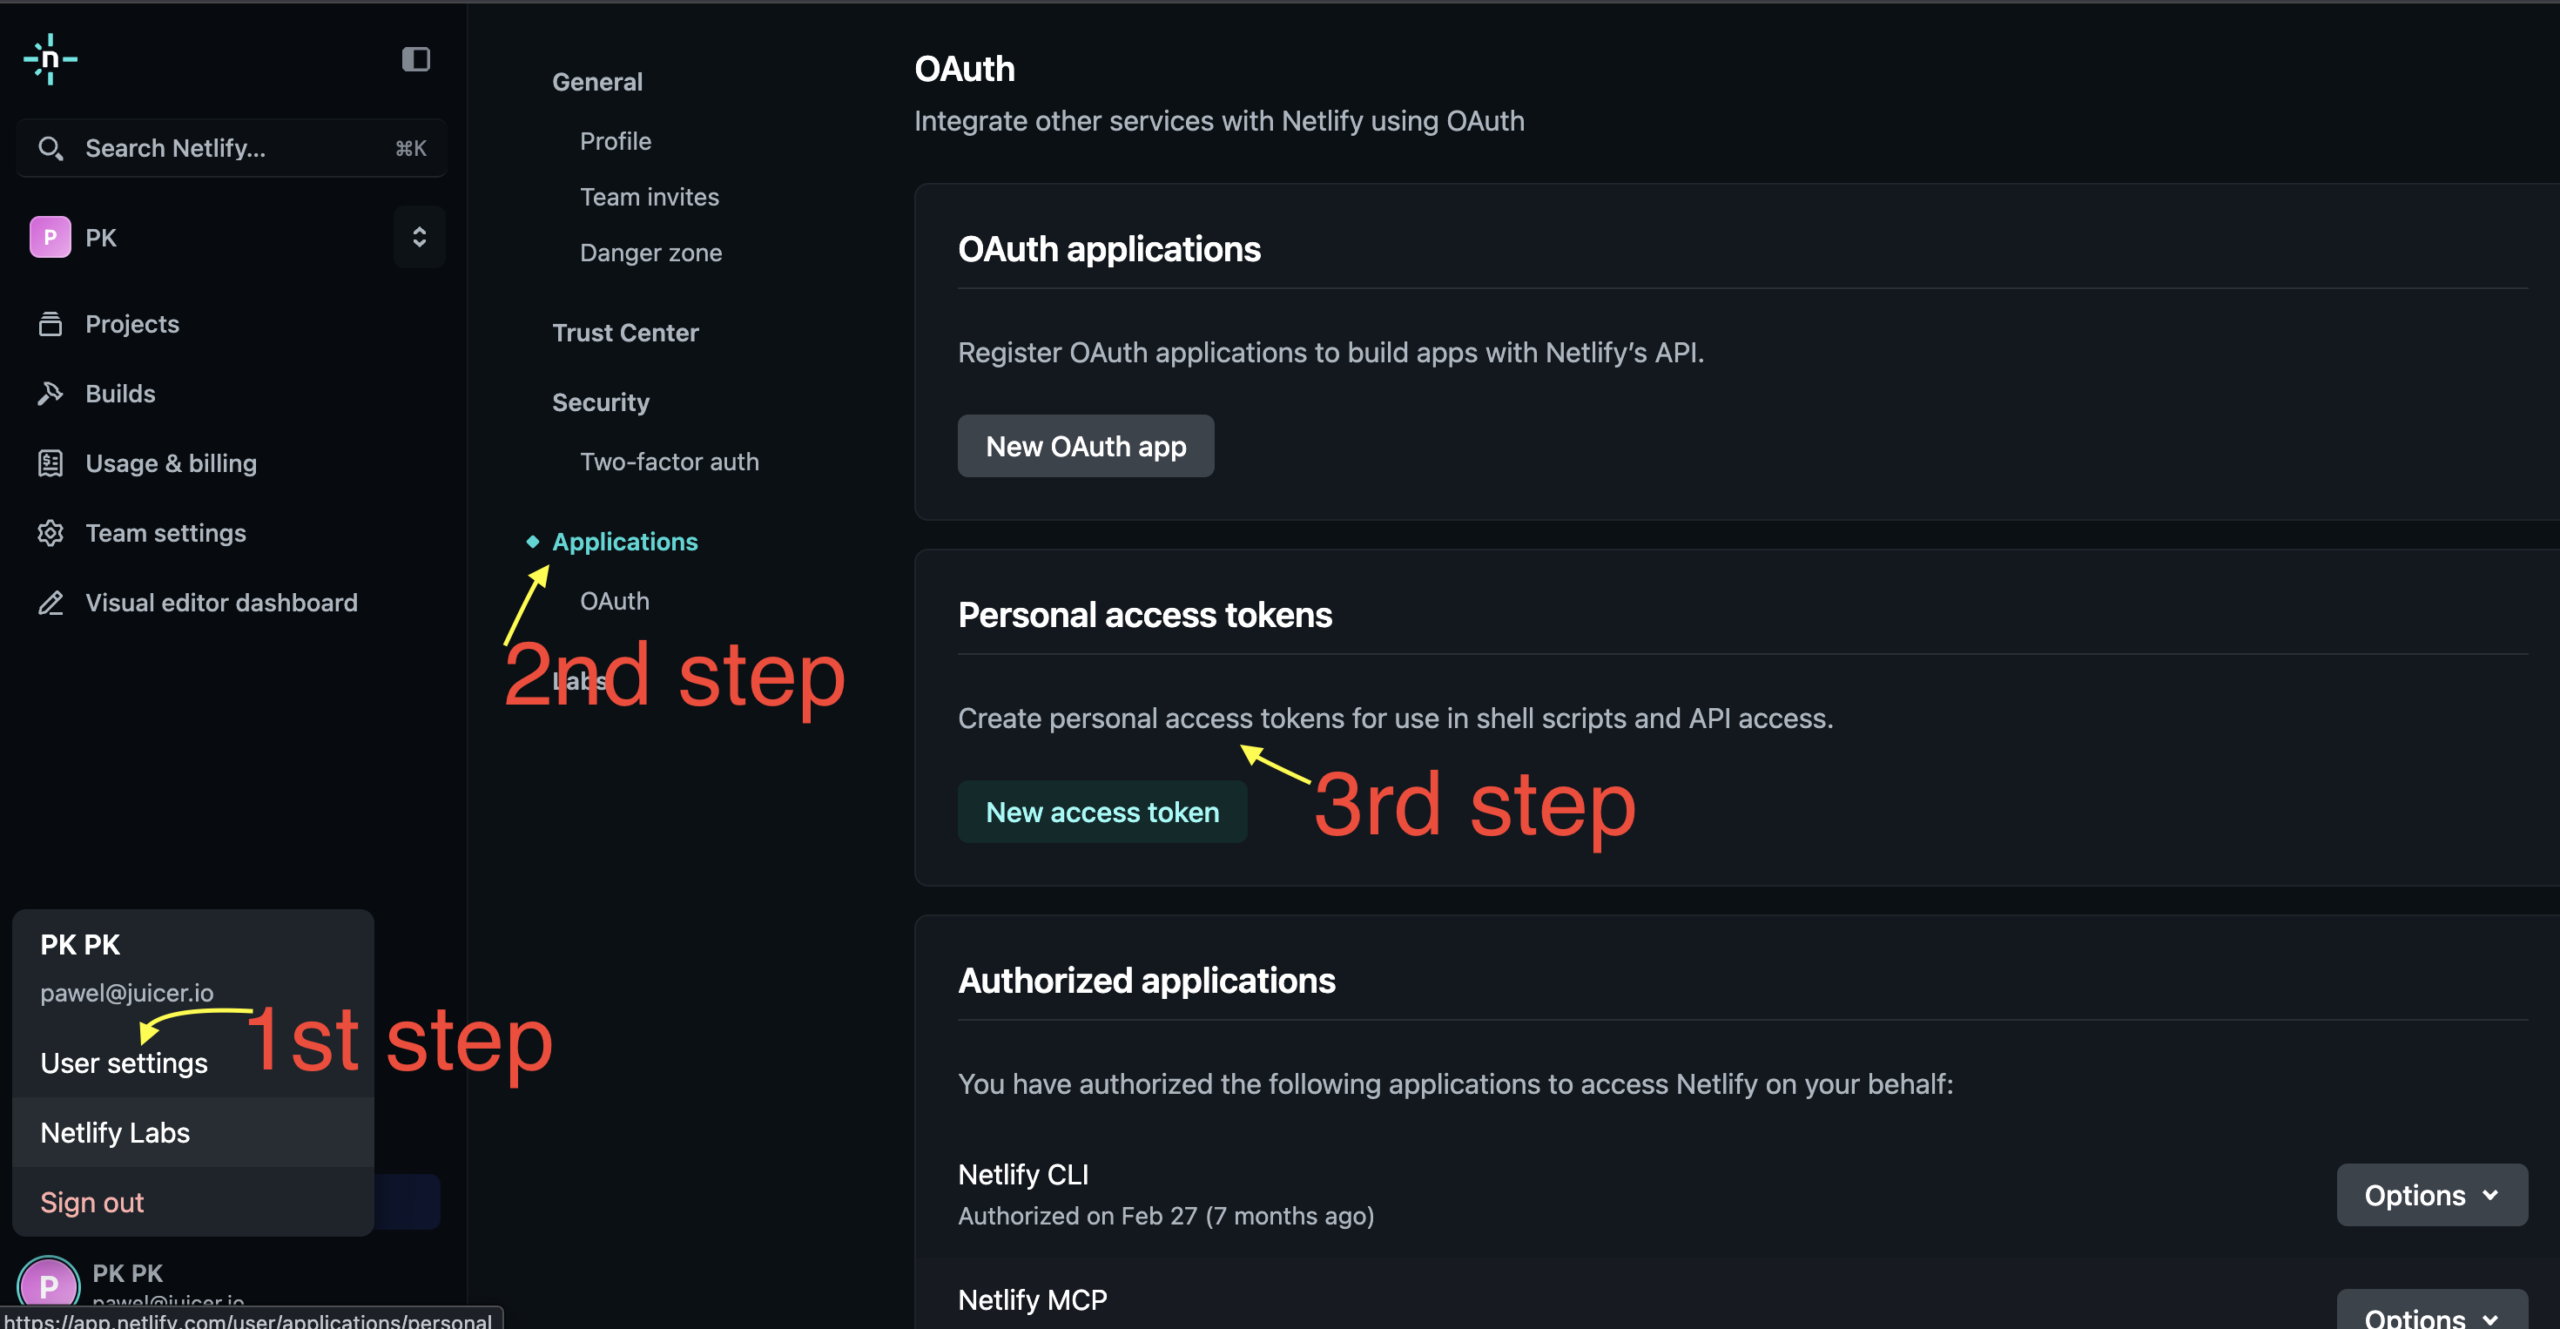
Go to User settings (bottom-left corner) → Applications → OAuth → Personal access tokens and click New access token. Give it a name (for example “Claude”) and copy it.
Add it to your .env file by hand, the same way as in Step 1: NETLIFY_AUTH_TOKEN=your-token-here
Step 4: Publish it
Paste:
Publish my Brand Listening page to Netlify. My token is in .env as NETLIFY_AUTH_TOKEN, load it but never print it. Use a site name that is hard to guess. Give me the link.
Done 🎉 Open the link, bookmark it and share it with your marketing team.
Want fresh mentions tomorrow? Just open Claude and say:
Refresh my Brand Listening page with the newest mentions and publish it again.
Privacy note: this page is public. Anyone with the link can open it, so share it only with your team, and do not publish confidential data or sensitive internal analysis this way. If your dashboard contains private information, add proper access controls before sharing it.
That’s it. 4 simple steps, and your marketing team sees every mention of your brand, good or bad, in one place. Next time something negative pops up on Reddit, you’ll see it before it trends 😉
FAQs
Can I use an API to monitor brand mentions across social media?
Yes. The Juicer API returns posts from 15+ social platforms, including Reddit, LinkedIn, X, TikTok and YouTube, in one normalized format. You can pull the posts that mention your brand and feed them into any monitoring workflow, like the dashboard in this tutorial, a spreadsheet or a Slack channel.
Do I need separate APIs for Reddit, LinkedIn, X, TikTok and YouTube?
No. That is the main point of the Juicer API: one API key and one data format instead of building and maintaining a separate integration for every platform. Every post comes back with the same fields (platform, author, date, text and link), so one script works for all of them.
Does the Juicer API analyse sentiment?
Juicer feeds can classify posts as positive, neutral or negative with AI and filter them by sentiment. In this tutorial, Claude or Codex tags each mention instead, because it also writes a one-line reason for every tag, which helps your team decide what to answer first.
Hey guys, it’s Paul here, CEO at Juicer.io. Exactly one year ago, my life took a 180-degree turn. My developers showed me a very ugly-looking tool called Terminal. It’s already installed on your Mac (or you can use PowerShell on Windows). At first glance, it felt like I was back in the ’90s. Today? I don’t use anything else. Three computers, three terminals open, with plenty of tabs and agents running stuff for me. Here’s a short guide for dummies like myself on how to set up your own environment for experimenting with the API. Just a few simple steps to help you speed up your operations a lot. You do not have to be a tech person to do so. Just follow the below 10 steps, and you start building your own dashboards, systems, and PRs for developers 😄
Step 1: Finding the tool
On Mac → go to Apps and search for “Terminal”
On Windows → search for “PowerShell”
Step 2: Installing Claude or Codex
Open Terminal/PowerShell → If you use Claude paste this one to terminal and hit Enter:
curl -fsSL https://claude.ai/install.sh | bash
Next go through the authentication with Claude browser and connect it with Terminal (so you can use Claude Code through the terminal)
If you use Codex paste this:
npm install -g @openai/codex
It will also ask you to authenticate → do it.
Step 3: Connecting APPs → Warning!
Connect all of your apps through ChatGPT / Claude in browser / desktop app. In Claude go to settings → customize → connectors and connect all of the apps you work with (Gmail, Outlook, Canva, Notion, Slack, Juicer.io, whatever you use).
In Chat GPT go to settings → plugins → connect all of the apps you use (Juicer.io, Gmail, Outlook, Calendar, whatever you use)
WARNING: Just remember that by adding permissions and connecting the apps, you usually give the AI both read and write permission to the app. Just double check what you want to share with AI, and turn-off auto-learning for LLMs from your data.
Step 4: Starting the session
Open a new terminal window with “ctrl and t” / “command and t”
Always write “Claude” when you start a new session or Codex —> depending on which one you use
Step 5: Create a dedicated project folder for AI memory.
Tell Claude/Codex to save everything in a single folder it creates for you. Tell it you want to keep working in that folder and save notes about your progress so it can pick up where you left off. Working in a terminal is different from using Claude or ChatGPT in desktop or browser apps. Save important context, decisions, and progress in files so your agent can read them later and understand what you’ve been working on. Simply keeping everything in one folder doesn’t automatically preserve its memory. Remember this!
Step 6: Initialize the MCP
Input the command: /mcp
You will get the list of tools that you are connected to. It will allow claude/codex to communicate with all of them and build things for you
Step 7: Passwords + API keys
This is something that will change your way of working. MCPs are great, but API keys are even more powerful (and you look cool, like a hacker). There is one rule nobody tells you, and I got it wrong at the very beginning, so do not repeat my mistakes 🙂
Never paste passwords or API keys directly into the terminal.
They stay in your shell history and in the session transcript. Put them in a .env file instead, but set up the guardrails first , before that file exists.
Step 7a: Set the guardrail (once, before you create any .env)
Paste this into Claude:
Add these entries to the permissions.deny array in my ~/.claude/settings.json,
creating the file or the section if it doesn't exist, then show me the result:

Read(./.env)
Read(./.env.*)
Read(./**/*.pem)
Read(./**/*.key)
Read(./**/credentials*)
Read(./**/secrets*)
This writes a real rule into a real config file. It is checked by the tool itself before Claude runs, in every future session, in every folder. Typing “never read my .env” into the chat does not do this, that is just a message, it is forgotten the moment you start a new session, and it is a polite request to the model rather than a lock.
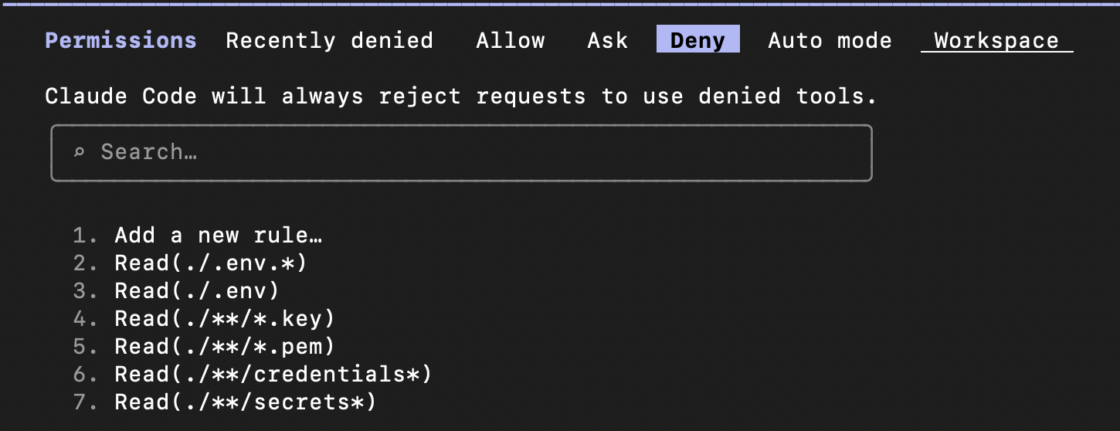
To check it worked, type /permissions and look at the Deny list.
Step 7b: Create the .env yourself
Don’t ask Claude to create it or open it. In the terminal:
touch .env
open -e .env        (on Windows: notepad .env)
Paste your key inside the .env file (not terminal) as NETLIFY_AUTH_TOKEN=your-key-here, save, close.
Step 7c: Keep it out of your project history
If you use git, tell Claude: “add .env to .gitignore”. A leaked key is almost never leaked by someone reading the file. It is leaked by it being committed or pasted into a log.
Step 7d: How Claude uses the key without seeing it
The tools (Netlify, Vercel, Supabase) read the key from the environment themselves. So you say:
“deploy this with Netlify, the token is in .env, load it into the environment, don’t print it.”
Claude passes the value straight to the tool. It works, and the key never appears in your chat.
Step 8: You are now DEVELOPER (Just kidding → but almost there).
Once you’ve generated your free Juicer API key, try this as a practice exercise: ask your agent to analyze your Instagram or LinkedIn profile, or use your company’s profile and compare it with competitors. Ask it to show you the available data and highlight the key differences. See how powerful it is!
Important note:Before deploying it, always ask Claude/Codex to generate the HTML output first and open it in your browser so you can preview it and correct/improve if needed.
Step 9: Deploy Your App with Netlify or Vercel.
You have the data, you like what you see, and you want to share it with others? Bring your dashboard, or your own vibe-coded app to life by deploying it with Netlify or Vercel. Both offer free plans, with usage limits, for hosting your project’s frontend. Once you’ve created an account, ask Claude/Codex to help you deploy your project. If you need an access token, store it securely in a local .env file, keep that file out of Git, and never expose the token in your frontend code.
Step 10: Store Data Using Supabase
Ok, all good. You have your projects but you want to store the data somewhere. You can use supabase to do so. Simply register with a free plan and create your own database for projects that require it. It works exactly the same, just an API key, and that’s it.
Create the API key on their website, add it to your .env by hand as in Step 7, and tell Claude the name of the variable, not the value.
Enjoy your nice journey with “coding”. Now you can create agents, and speed up your daily operations a lot! 10 simple steps that can improve your work a lot!
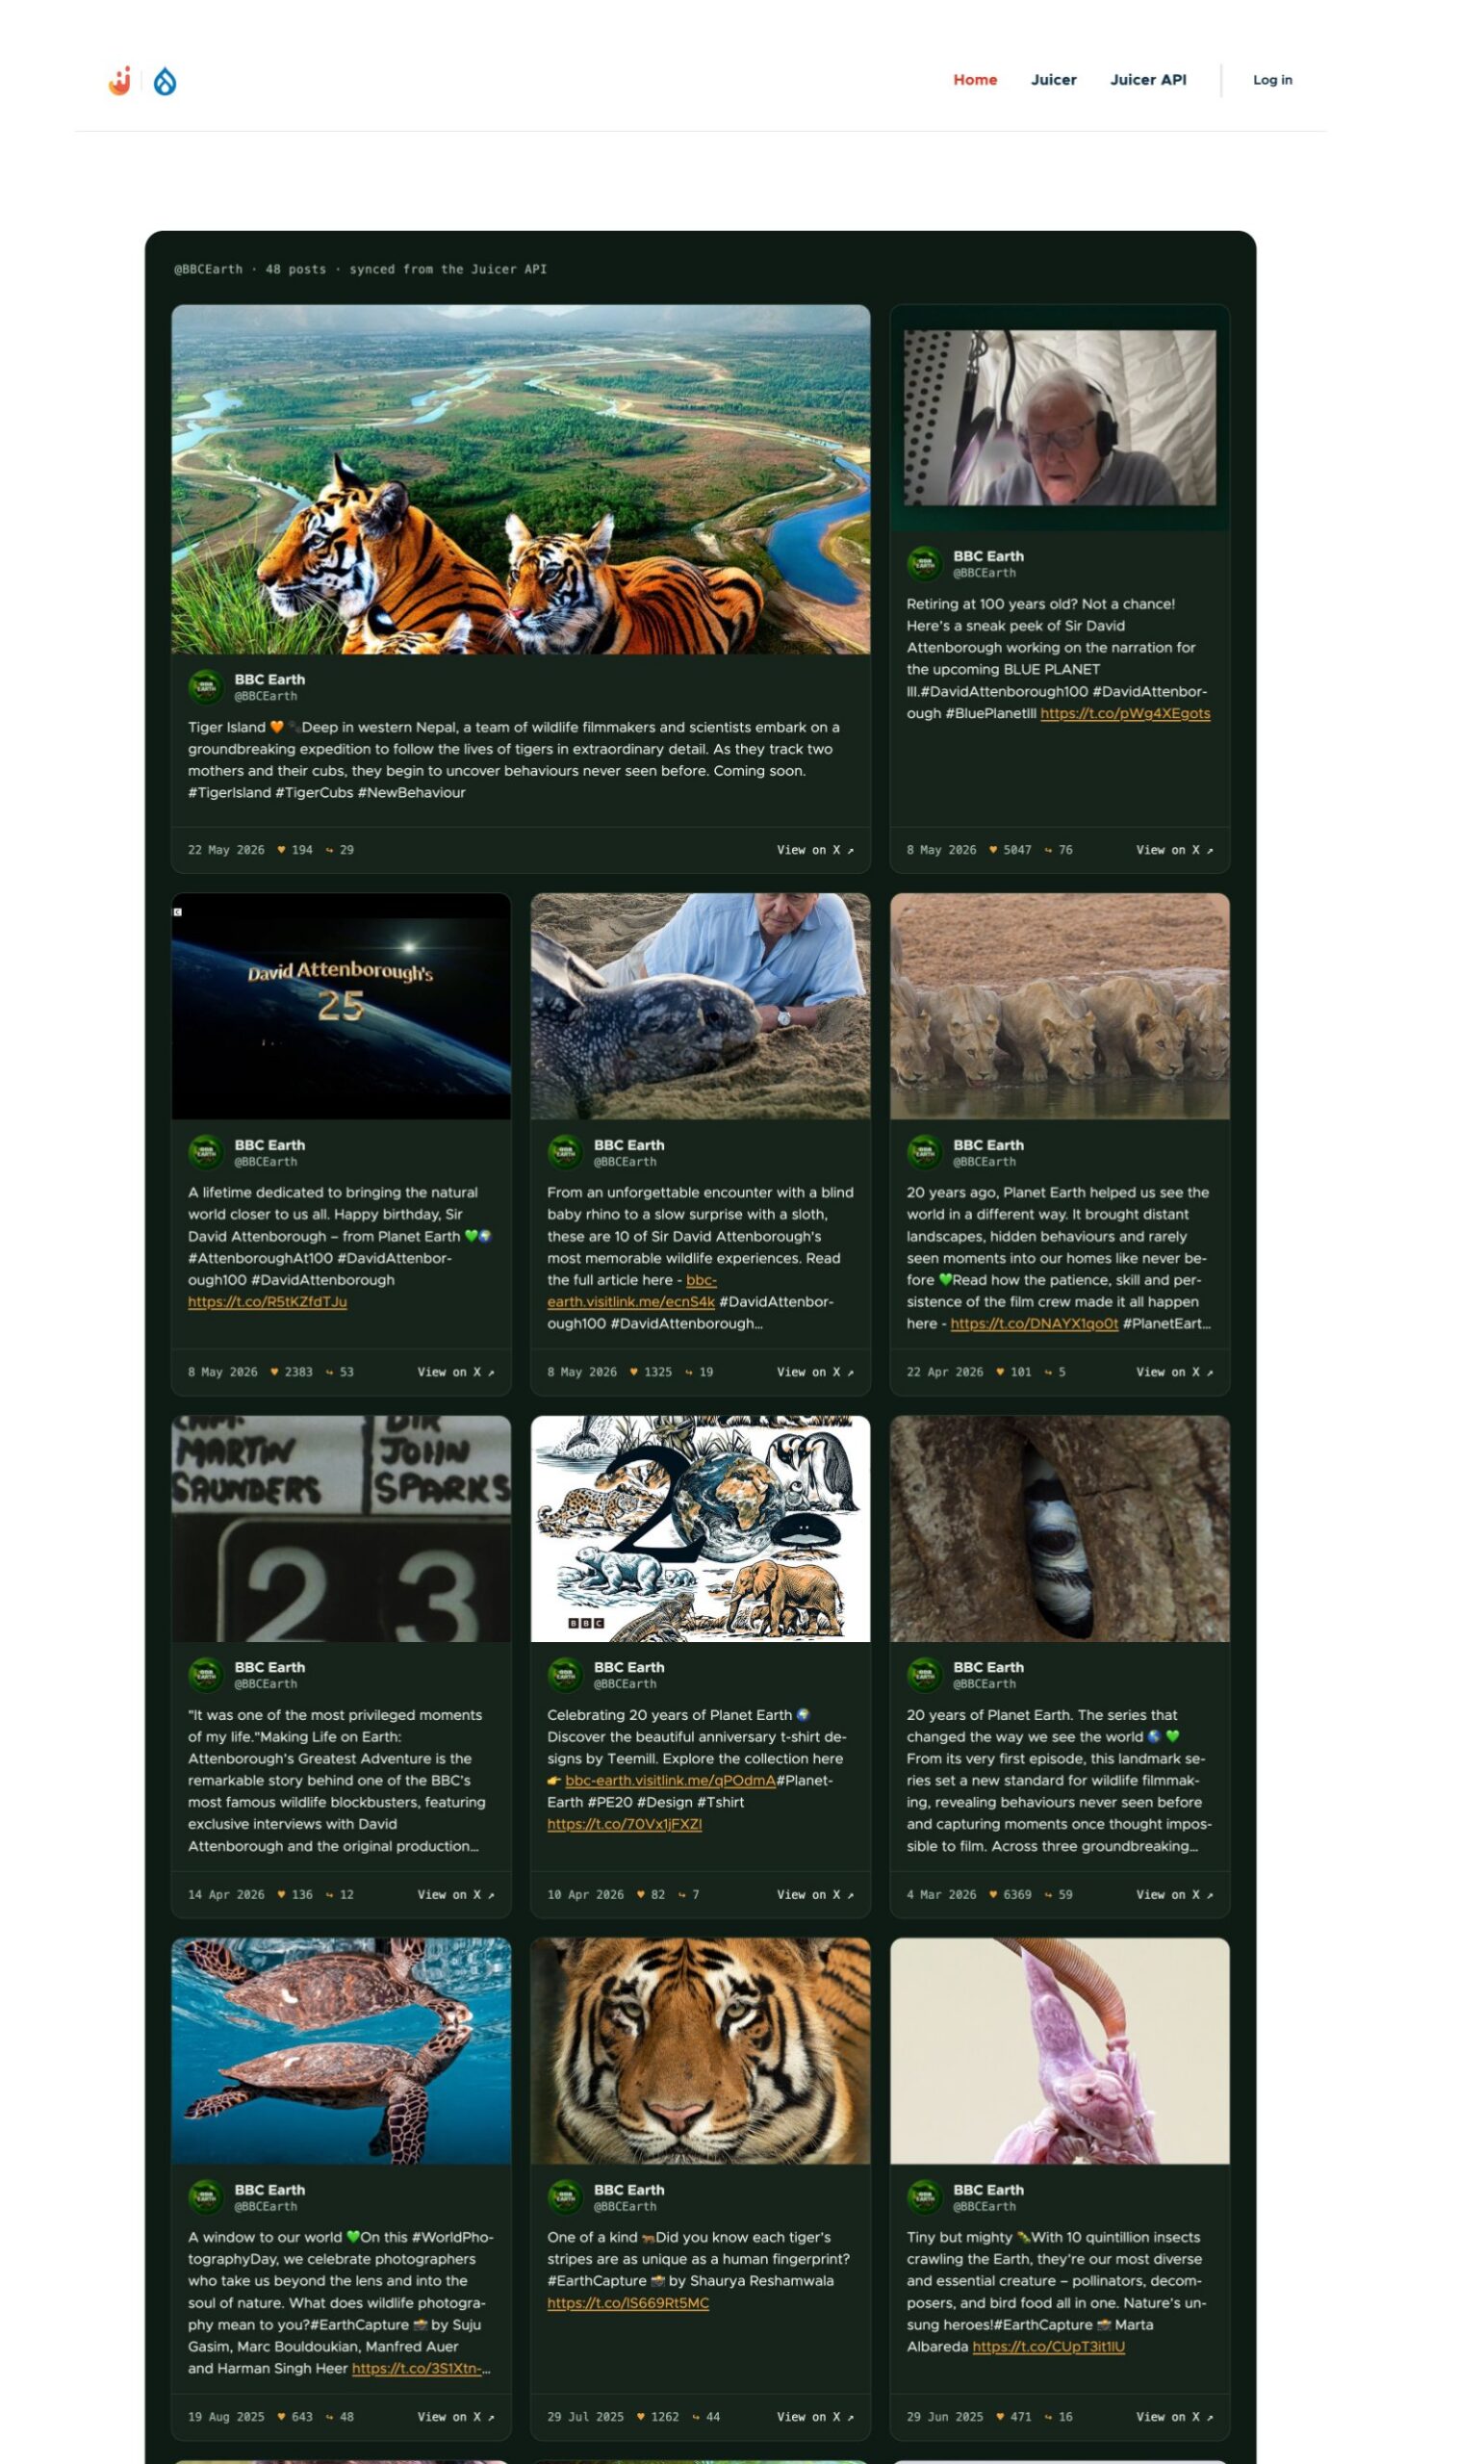
A Drupal site that automatically mirrors a brand’s X (Twitter) posts as first-class Drupal content. BBC Earth’s posts flow from X into Juicer, from Juicer’s API into social_post nodes, and onto a styled card-grid page – with no manual work after setup.
🌐
See it live:juicerfeed.com – a live example of this integration, running on a small VPS. It re-syncs from the Juicer API every hour, so the posts you see are whatever BBC Earth last published.
Why nodes instead of a JS embed? Once posts are real Drupal entities you get Views, search indexing, permissions, custom rendering, editorial workflows – in short, the whole Drupal toolbox.
The pipeline has two independent sync layers:
X (Juicer's own workers, per feed sync rate) -> Juicer
Juicer API (our cron module, hourly) -> Drupal nodes
Drupal View (cache tags, automatic) -> /bbc-earth page
Prerequisites
A Drupal 10.3+ / 11 site – this guide used 11.4.4 on DDEV, PHP 8.3
A Juicer account and API key generated at – juicer.io
drush 13
Part 1 – Juicer: one feed, one X source
Everything downstream needs exactly one thing from Juicer: a feed with an X source in it. In the spirit of this guide we’ll create it with two API calls – that said, the dashboard UI works just as well (see the aside below).
First, get an API key: in the Juicer dashboard, open the API page and generate a key. All Integration API requests authenticate with it as a Bearer token. The Juicer API docs cover authentication and every endpoint in detail.
id – addresses the feed on the authenticated Integration API (/v1/...), like the next call.
slug – auto-generated from the name. This guide addresses the feed by id throughout, but the slug is the feed’s readable handle in the dashboard and in Juicer’s embed URLs, so a good feed name earns you a good slug for free.
Then, Juicer starts pulling posts immediately. Two things to know:
The platform is "Twitter" even though the product is X today – GET /v1/platforms lists every valid platform + term_type combination.
Plan limits apply on the API exactly as in the UI: a maxed-out account gets a feed_limit_reached error on feed creation, and adding a source can return insufficient_credits on API-credit accounts.
🖱️
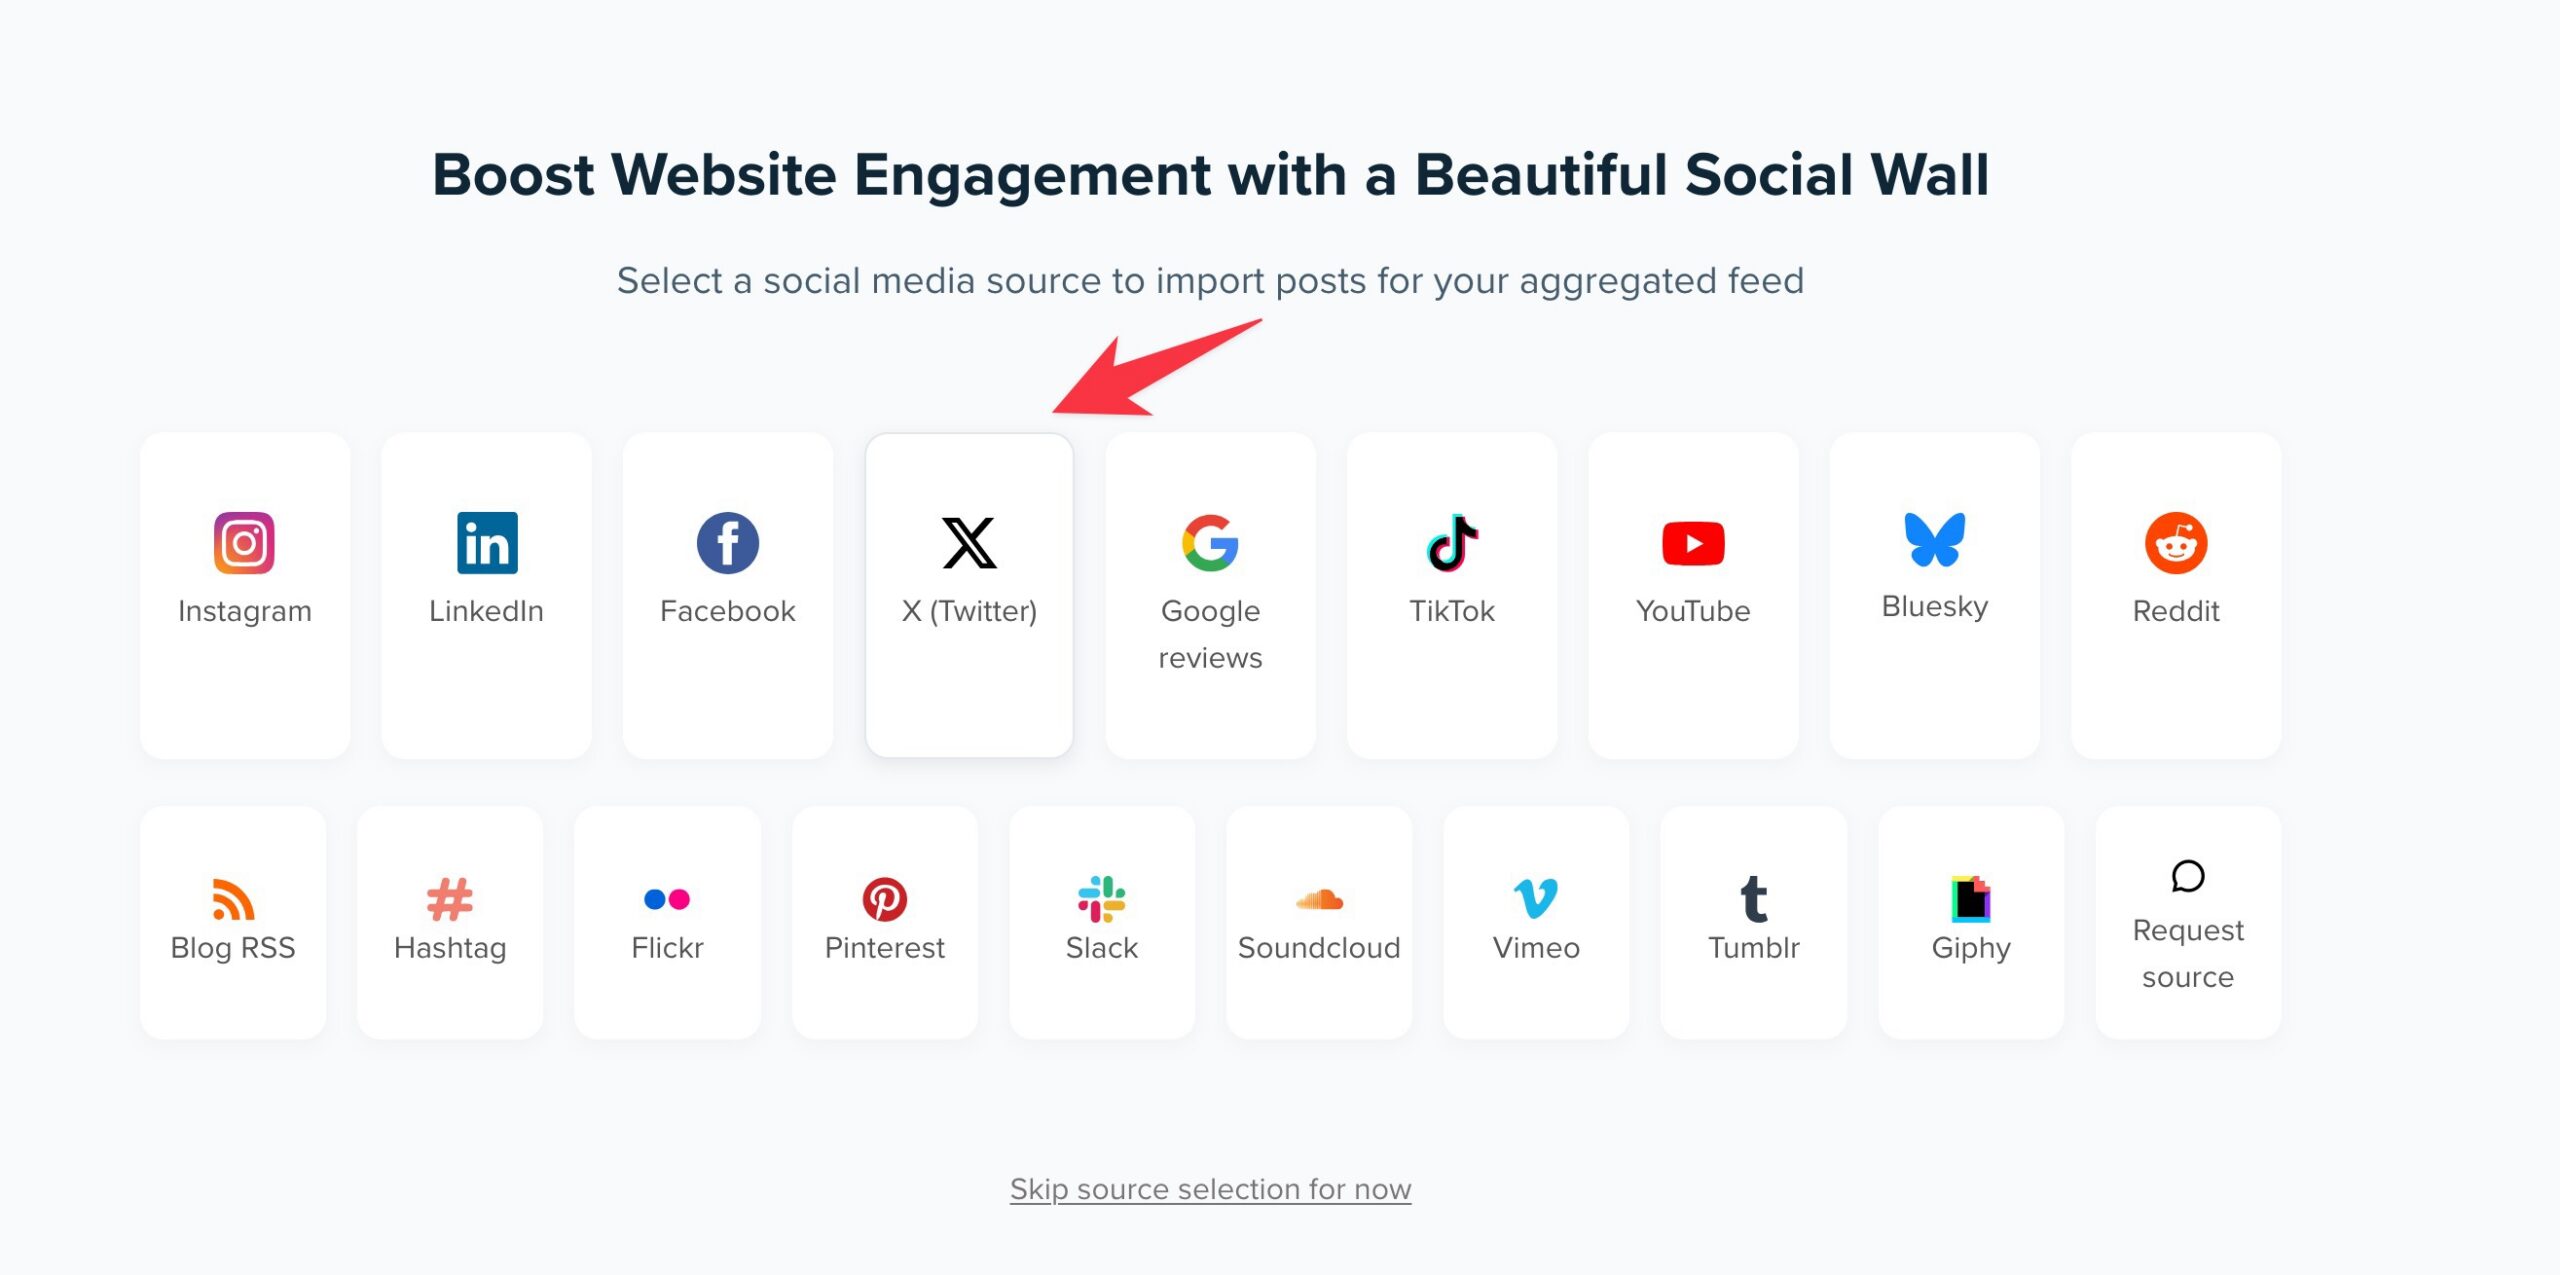
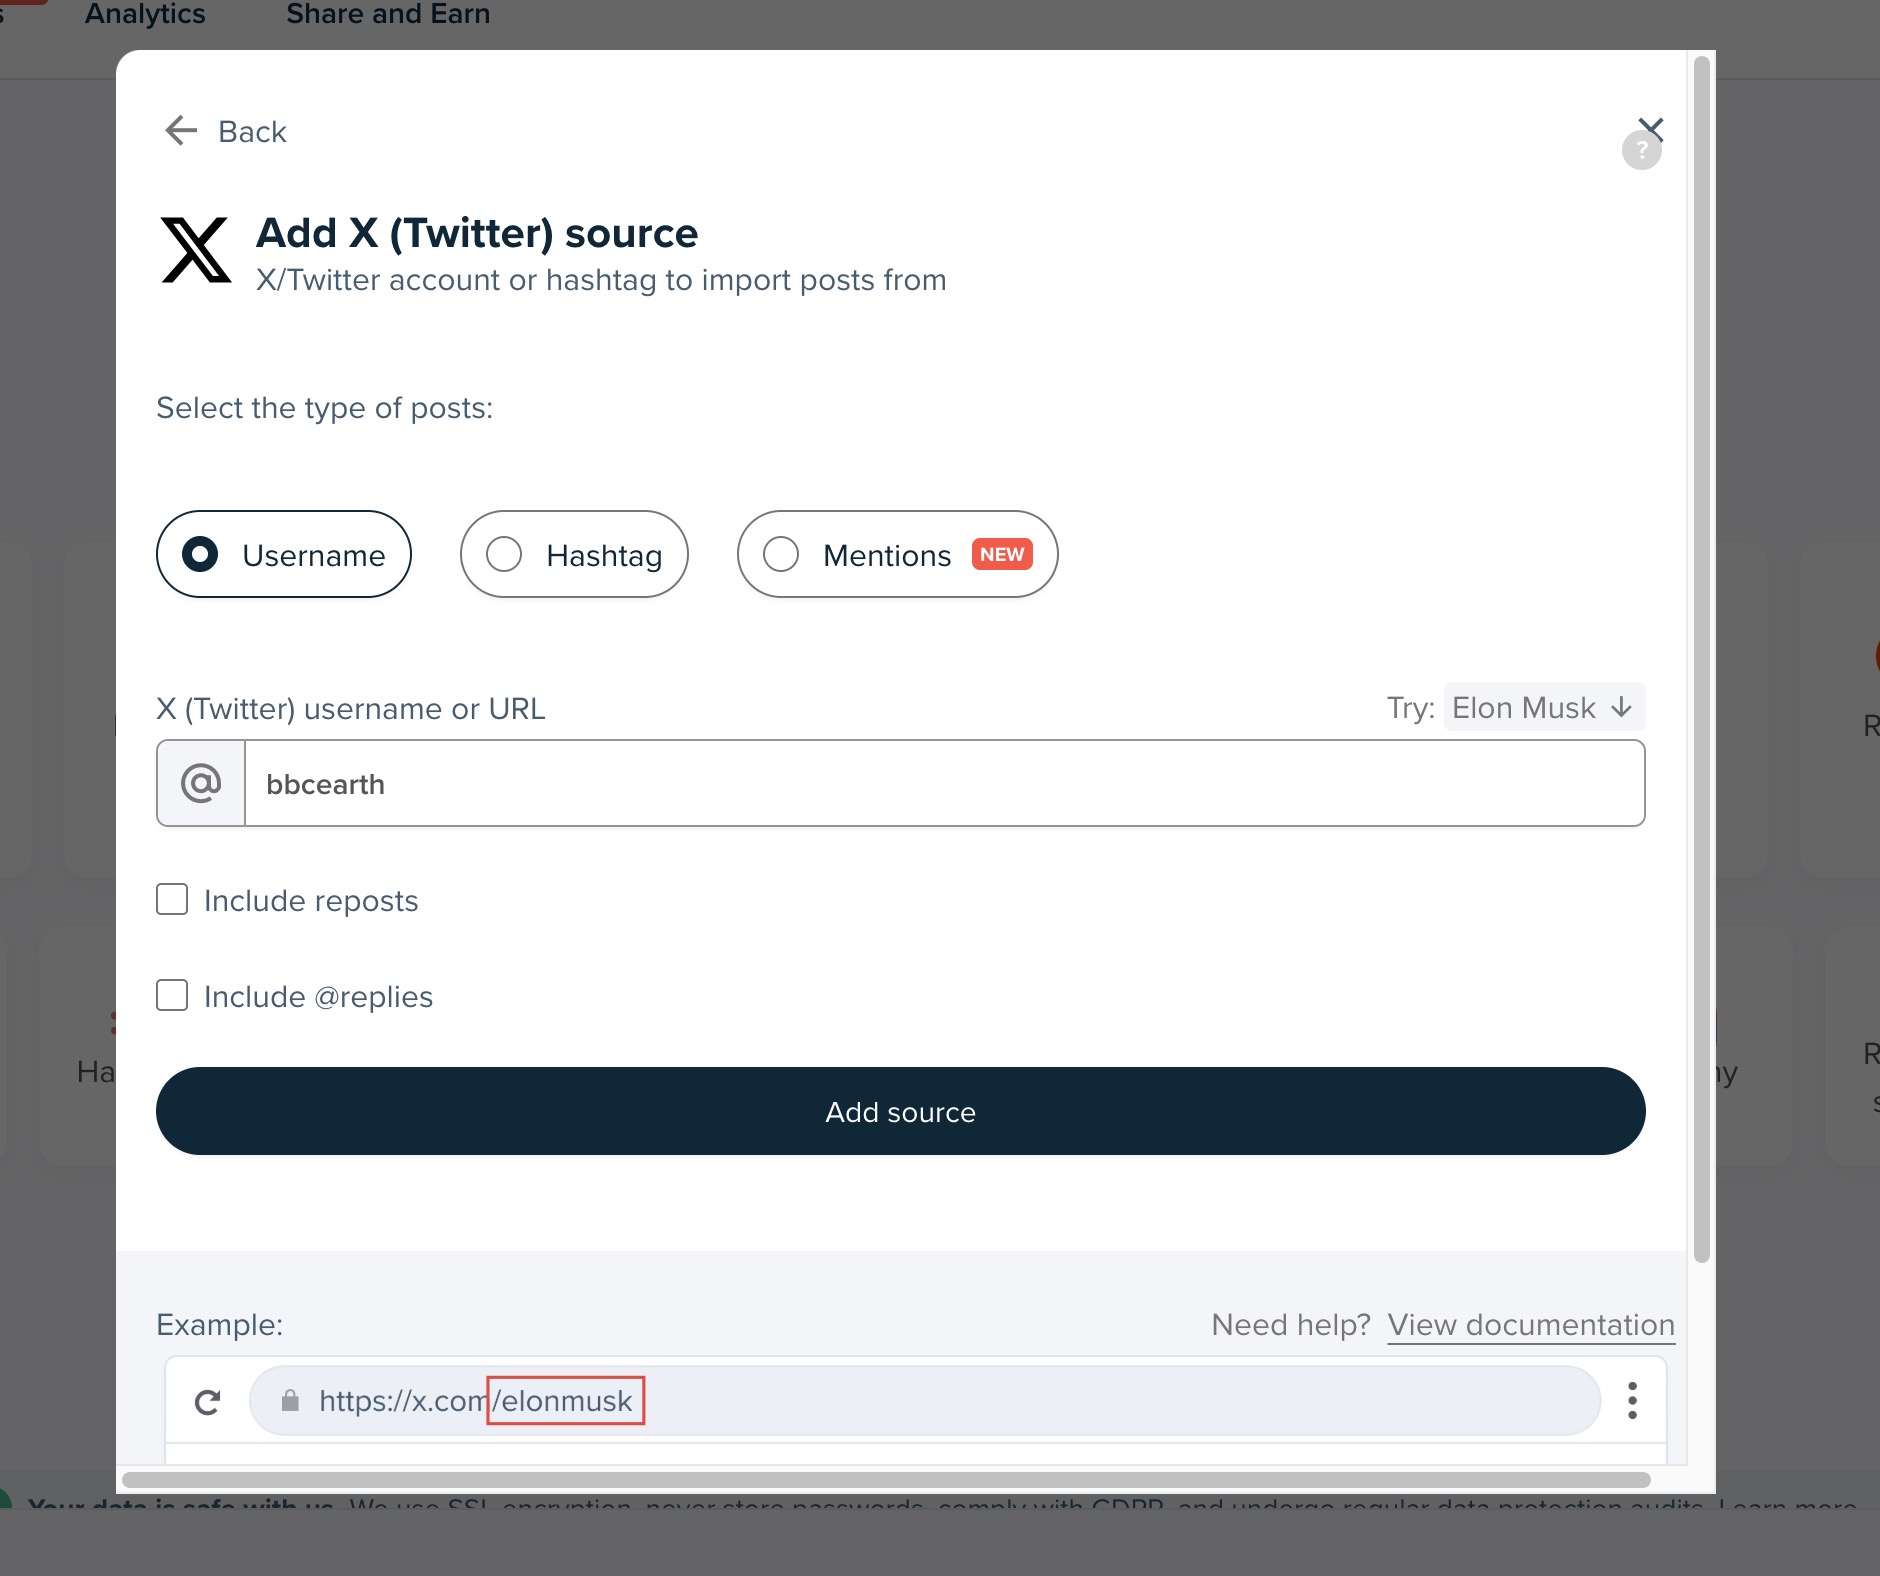
Prefer clicking? The Juicer dashboard does the same job. Click + New feed, pick X (Twitter) from the source-type grid, choose Username and enter bbcearth. Then rename the feed – pencil icon next to the name, set “BBC Earth X”, tick “Also update the feed’s URL” – so the auto-generated slug becomes a friendly bbc-earth-x.
Mind the feed’s sync rate
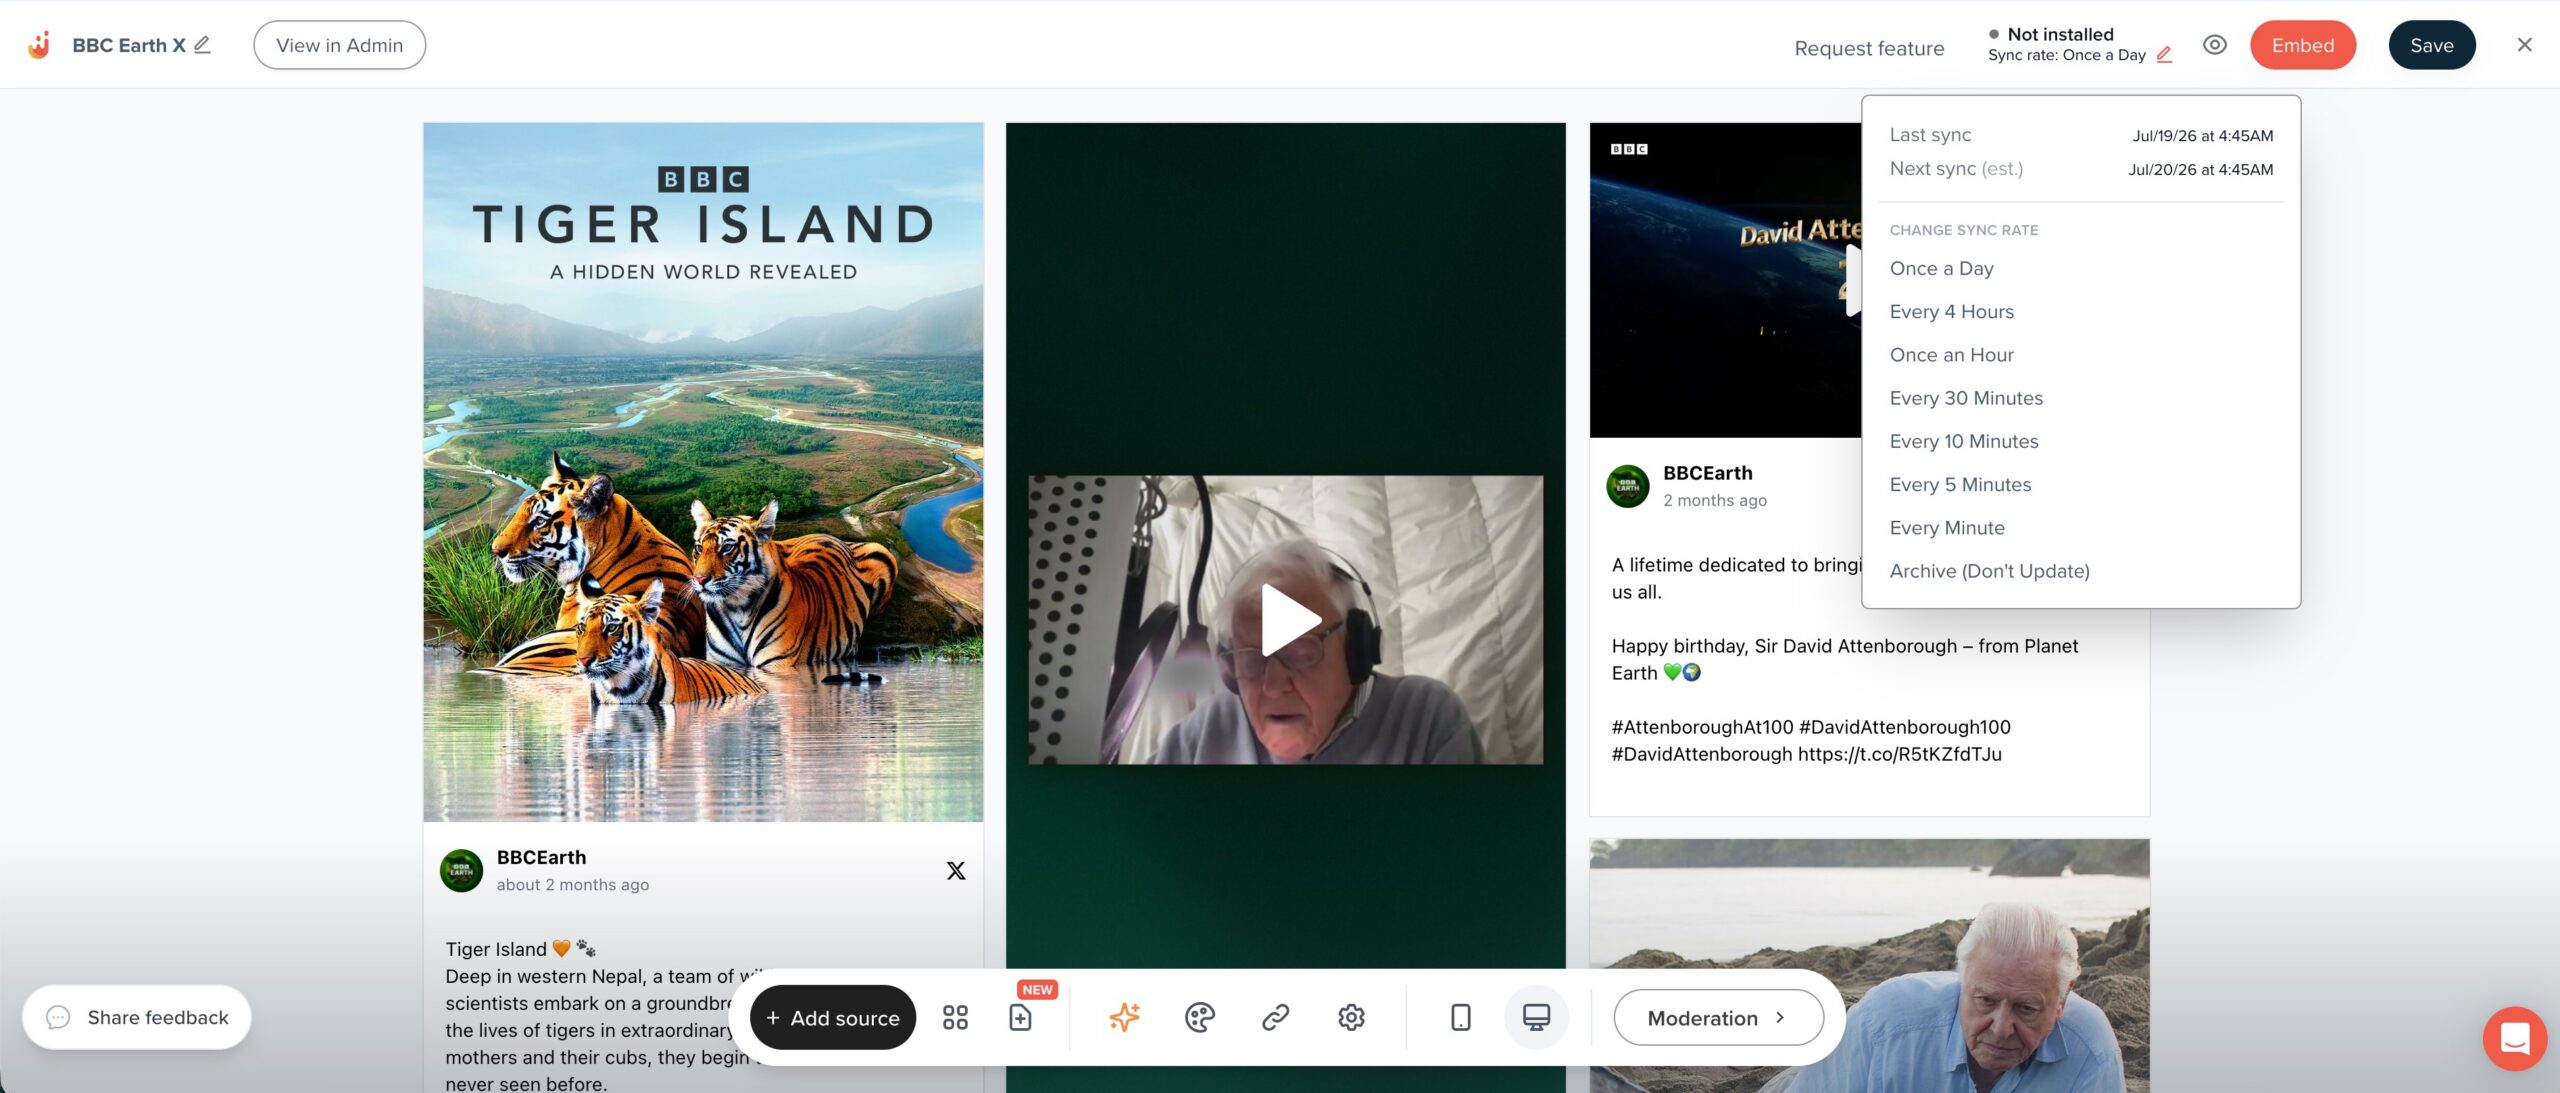
However you created it, note the sync rate in the feed header – e.g. “Once a Day”. That’s how often Juicer pulls new posts from X, and everything downstream can only ever be as fresh as it – the hourly Drupal cron in Part 7 cannot invent posts Juicer hasn’t fetched yet.
That rate isn’t fixed: it comes from your Juicer plan, and you can change it. At the time of writing, Free and Ad-Free feeds sync once a day, Mini Lite, Lite and Starter once an hour, and Pro every 10 minutes. On Team, Enterprise and Custom plans – and on paid API accounts – you can also override it per feed from the pencil beside the sync rate in the feed header, anywhere from every minute up to once a day, or set the feed to Archive so it stops updating altogether.
So if the posts ever look stale, check the plan and the feed’s sync rate before you go looking for a bug in the code.
Part 2 – Reading the feed through the Integration API
The key from Part 1 does double duty: the same Bearer token that created the feed also reads its posts. Everything below runs against the versioned Integration API, documented in the Juicer API reference.
Note the feed is addressed by the numeric id from Part 1, not the slug. If you built your feed in the dashboard and only know its slug, GET /v1/feeds lists your feeds with both ids and slugs, and GET /v1/feeds/{id}?include=sources returns a single feed’s details and its sources. Neither of those returns posts – that is this endpoint’s job.
Pagination is explicit.meta.total_pages and meta.total_count tell you exactly how far to go, so there is no paging until you hit an empty array. per_page defaults to 25 and caps at 100.
platform is the display name – "X (Twitter)", not an internal identifier. Match on that string.
Metrics are *_count, and a missing key means “not collected”. X returns like_count, comment_count, share_count, quote_count, bookmark_count and impression_count; a platform that doesn’t collect one omits it rather than reporting a misleading zero. Check with array_key_exists, not ?? 0, if the distinction matters to you.
message is plain text, not HTML. That suits Drupal: the Restricted HTML format we store it in runs filter_autop, which turns the line breaks into paragraphs, and filter_url, which linkifies the bare t.co URLs.
Media is an array. Images carry url; videos carry preview_image_url for the thumbnail, alongside width, height and alt_text where the platform supplies them. Media URLs are Juicer-proxied and hotlinkable.
moderation_status rides along on every post, and status defaults to public – so anything you moderated away in Juicer stays out of Drupal without any extra work on your side.
Part 3 – The Social Post content type in Drupal
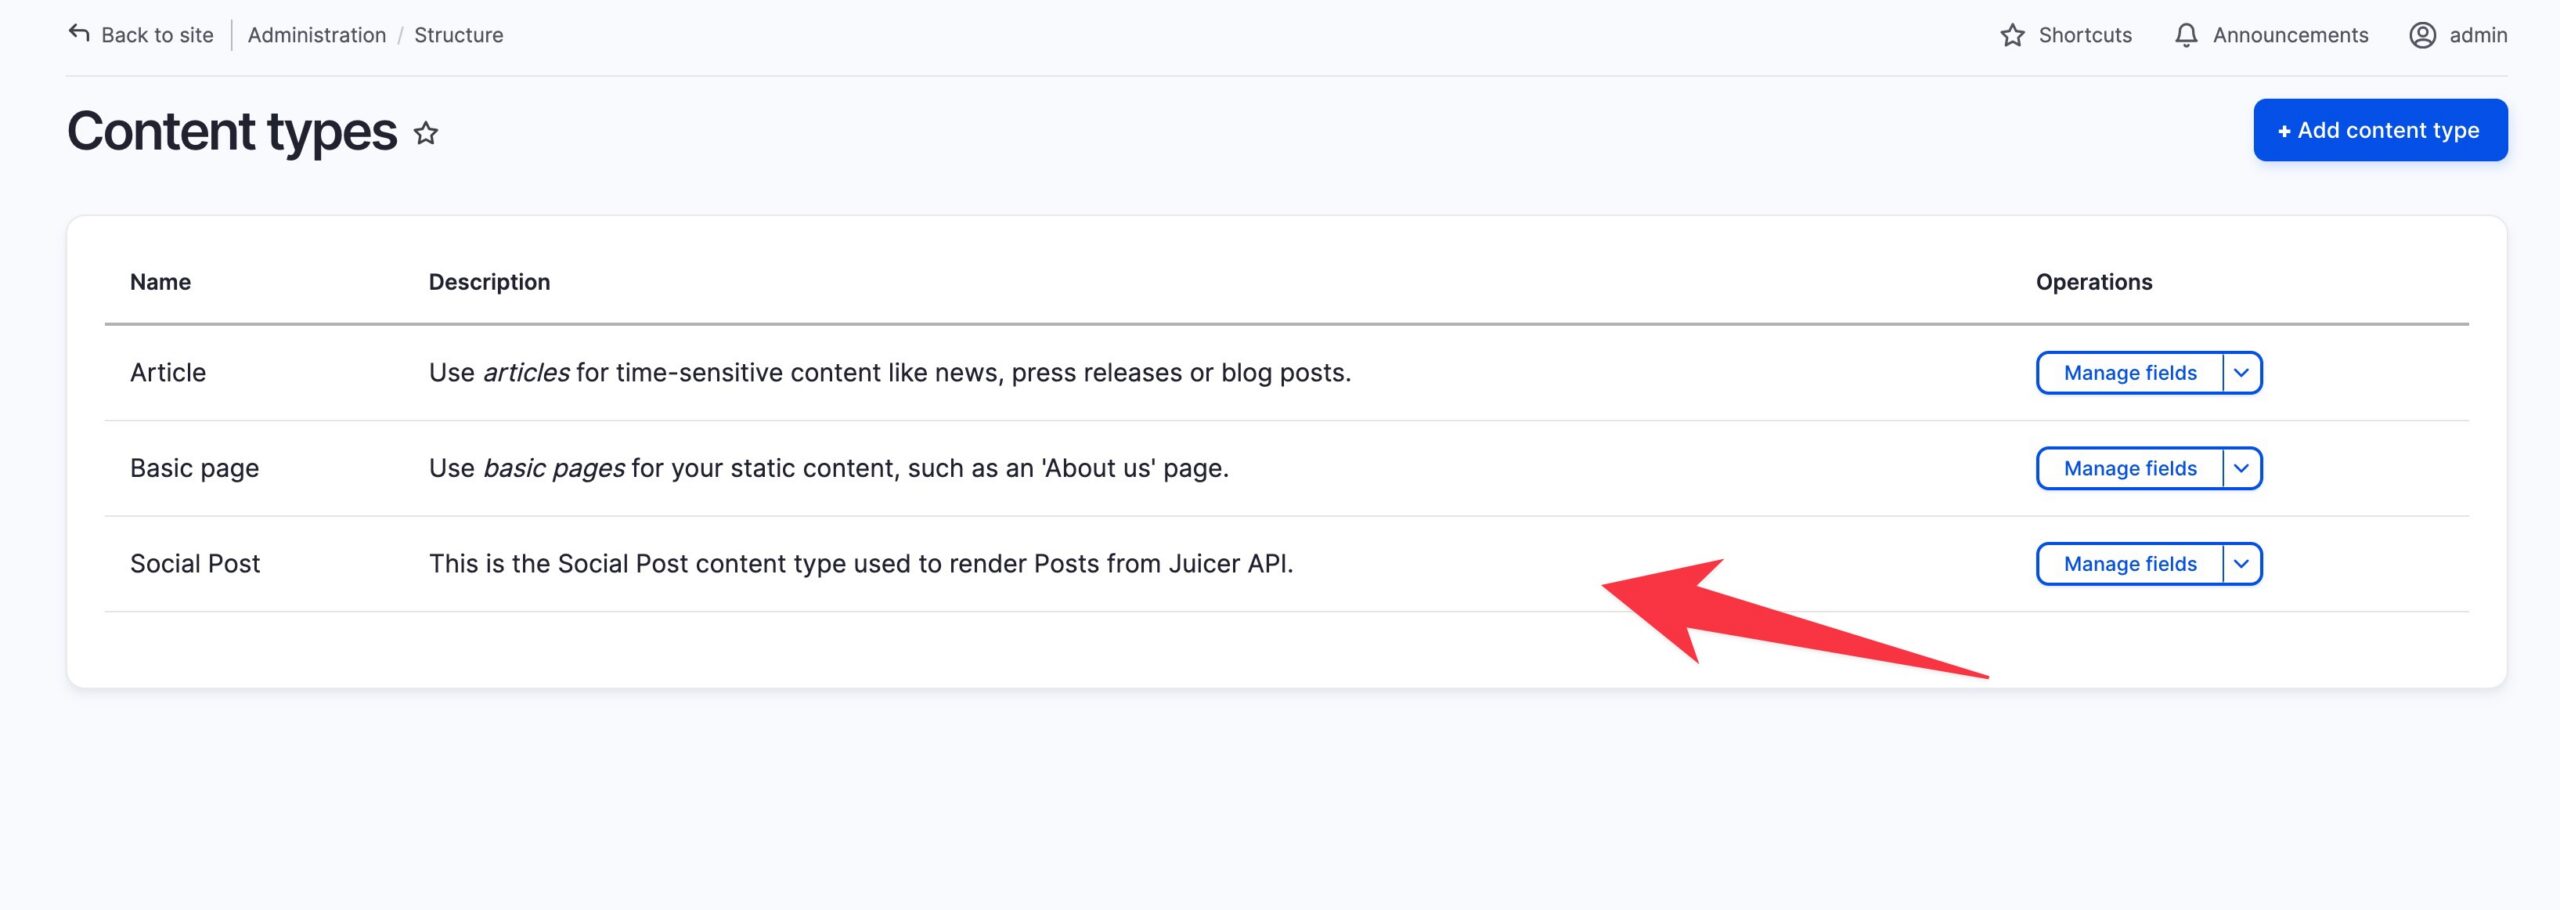
First, in your Drupal site create a plain content type – no custom entity code needed. Structure → Content types → Add content type: name Social Post, machine name social_post. Uncheck “Promoted to front page” in publishing options.
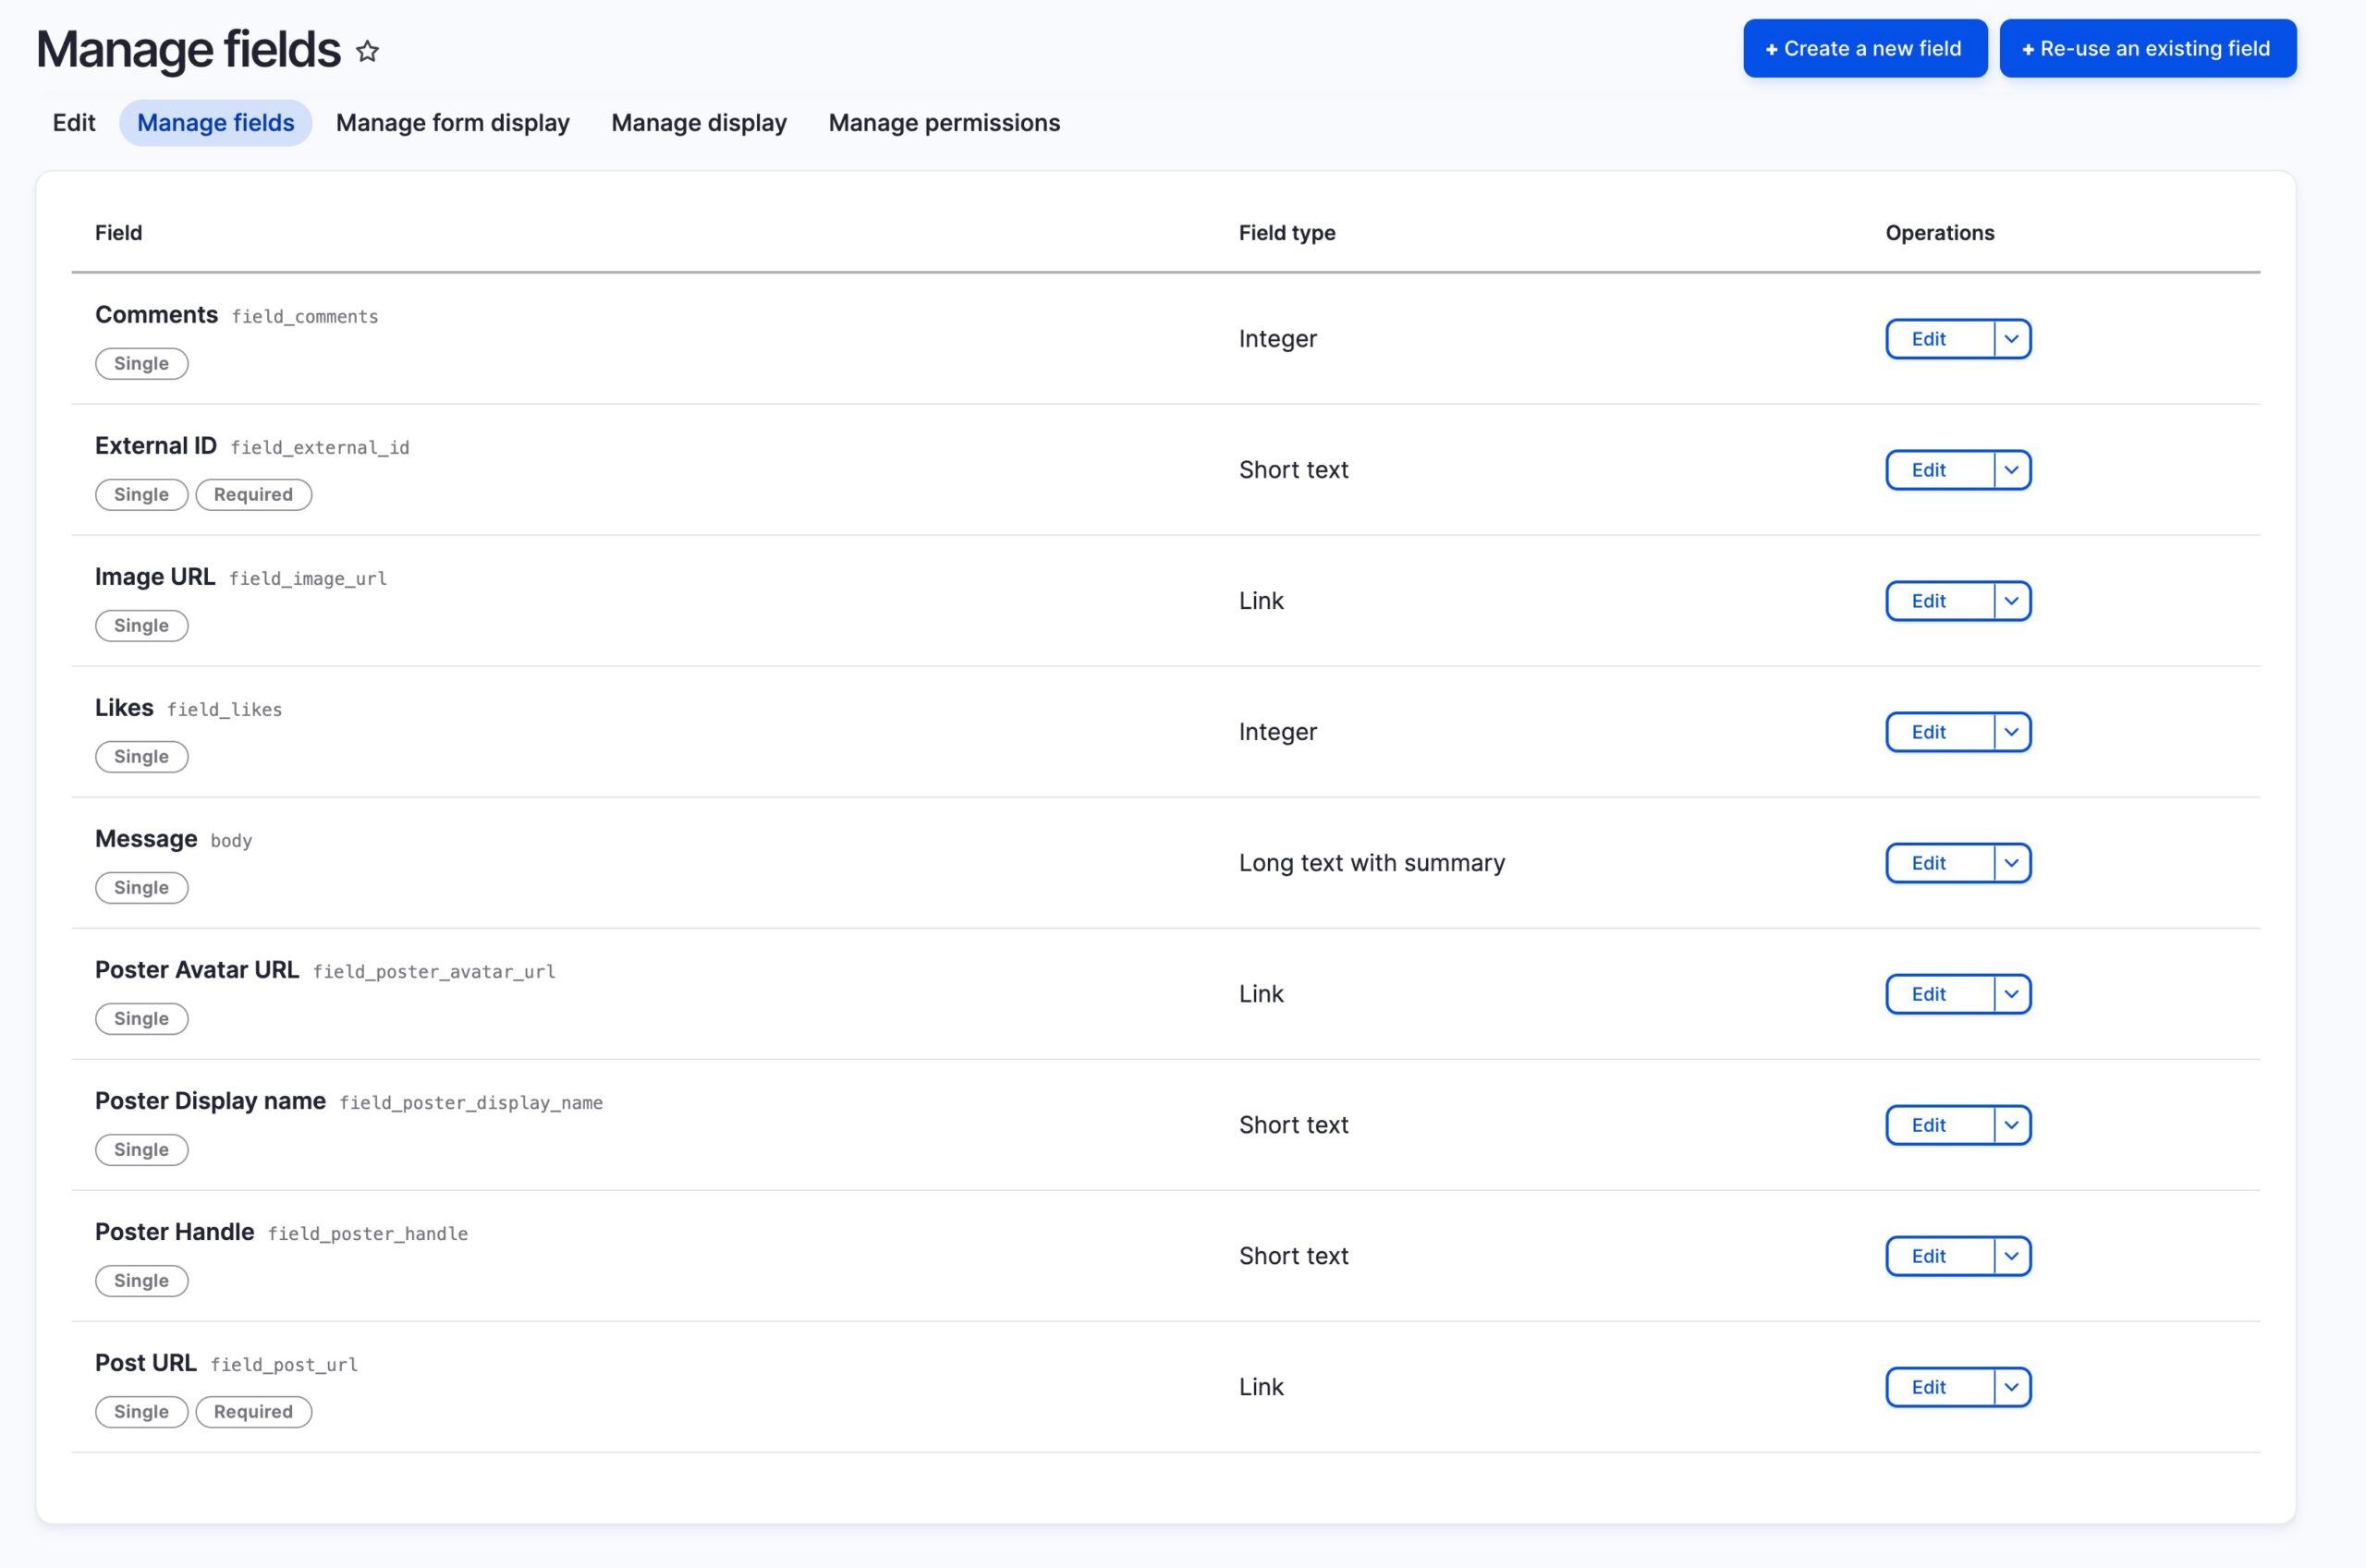
Then add fields under Manage fields:
Label
Machine name
Type
Notes
External ID
field_external_id
Text (plain)
Required – the tweet id, our dedupe key
Post URL
field_post_url
Link
Required – permalink on X
Image URL
field_image_url
Link
Post photo, rendered as an image by our template
Poster name
field_poster_display_name
Text (plain)
“BBC Earth”
Poster handle
field_poster_handle
Text (plain)
“BBCEarth”
Poster avatar URL
field_poster_avatar_url
Link
Likes
field_likes
Number (integer)
Comments
field_comments
Number (integer)
Three built-ins do double duty, saving three custom fields:
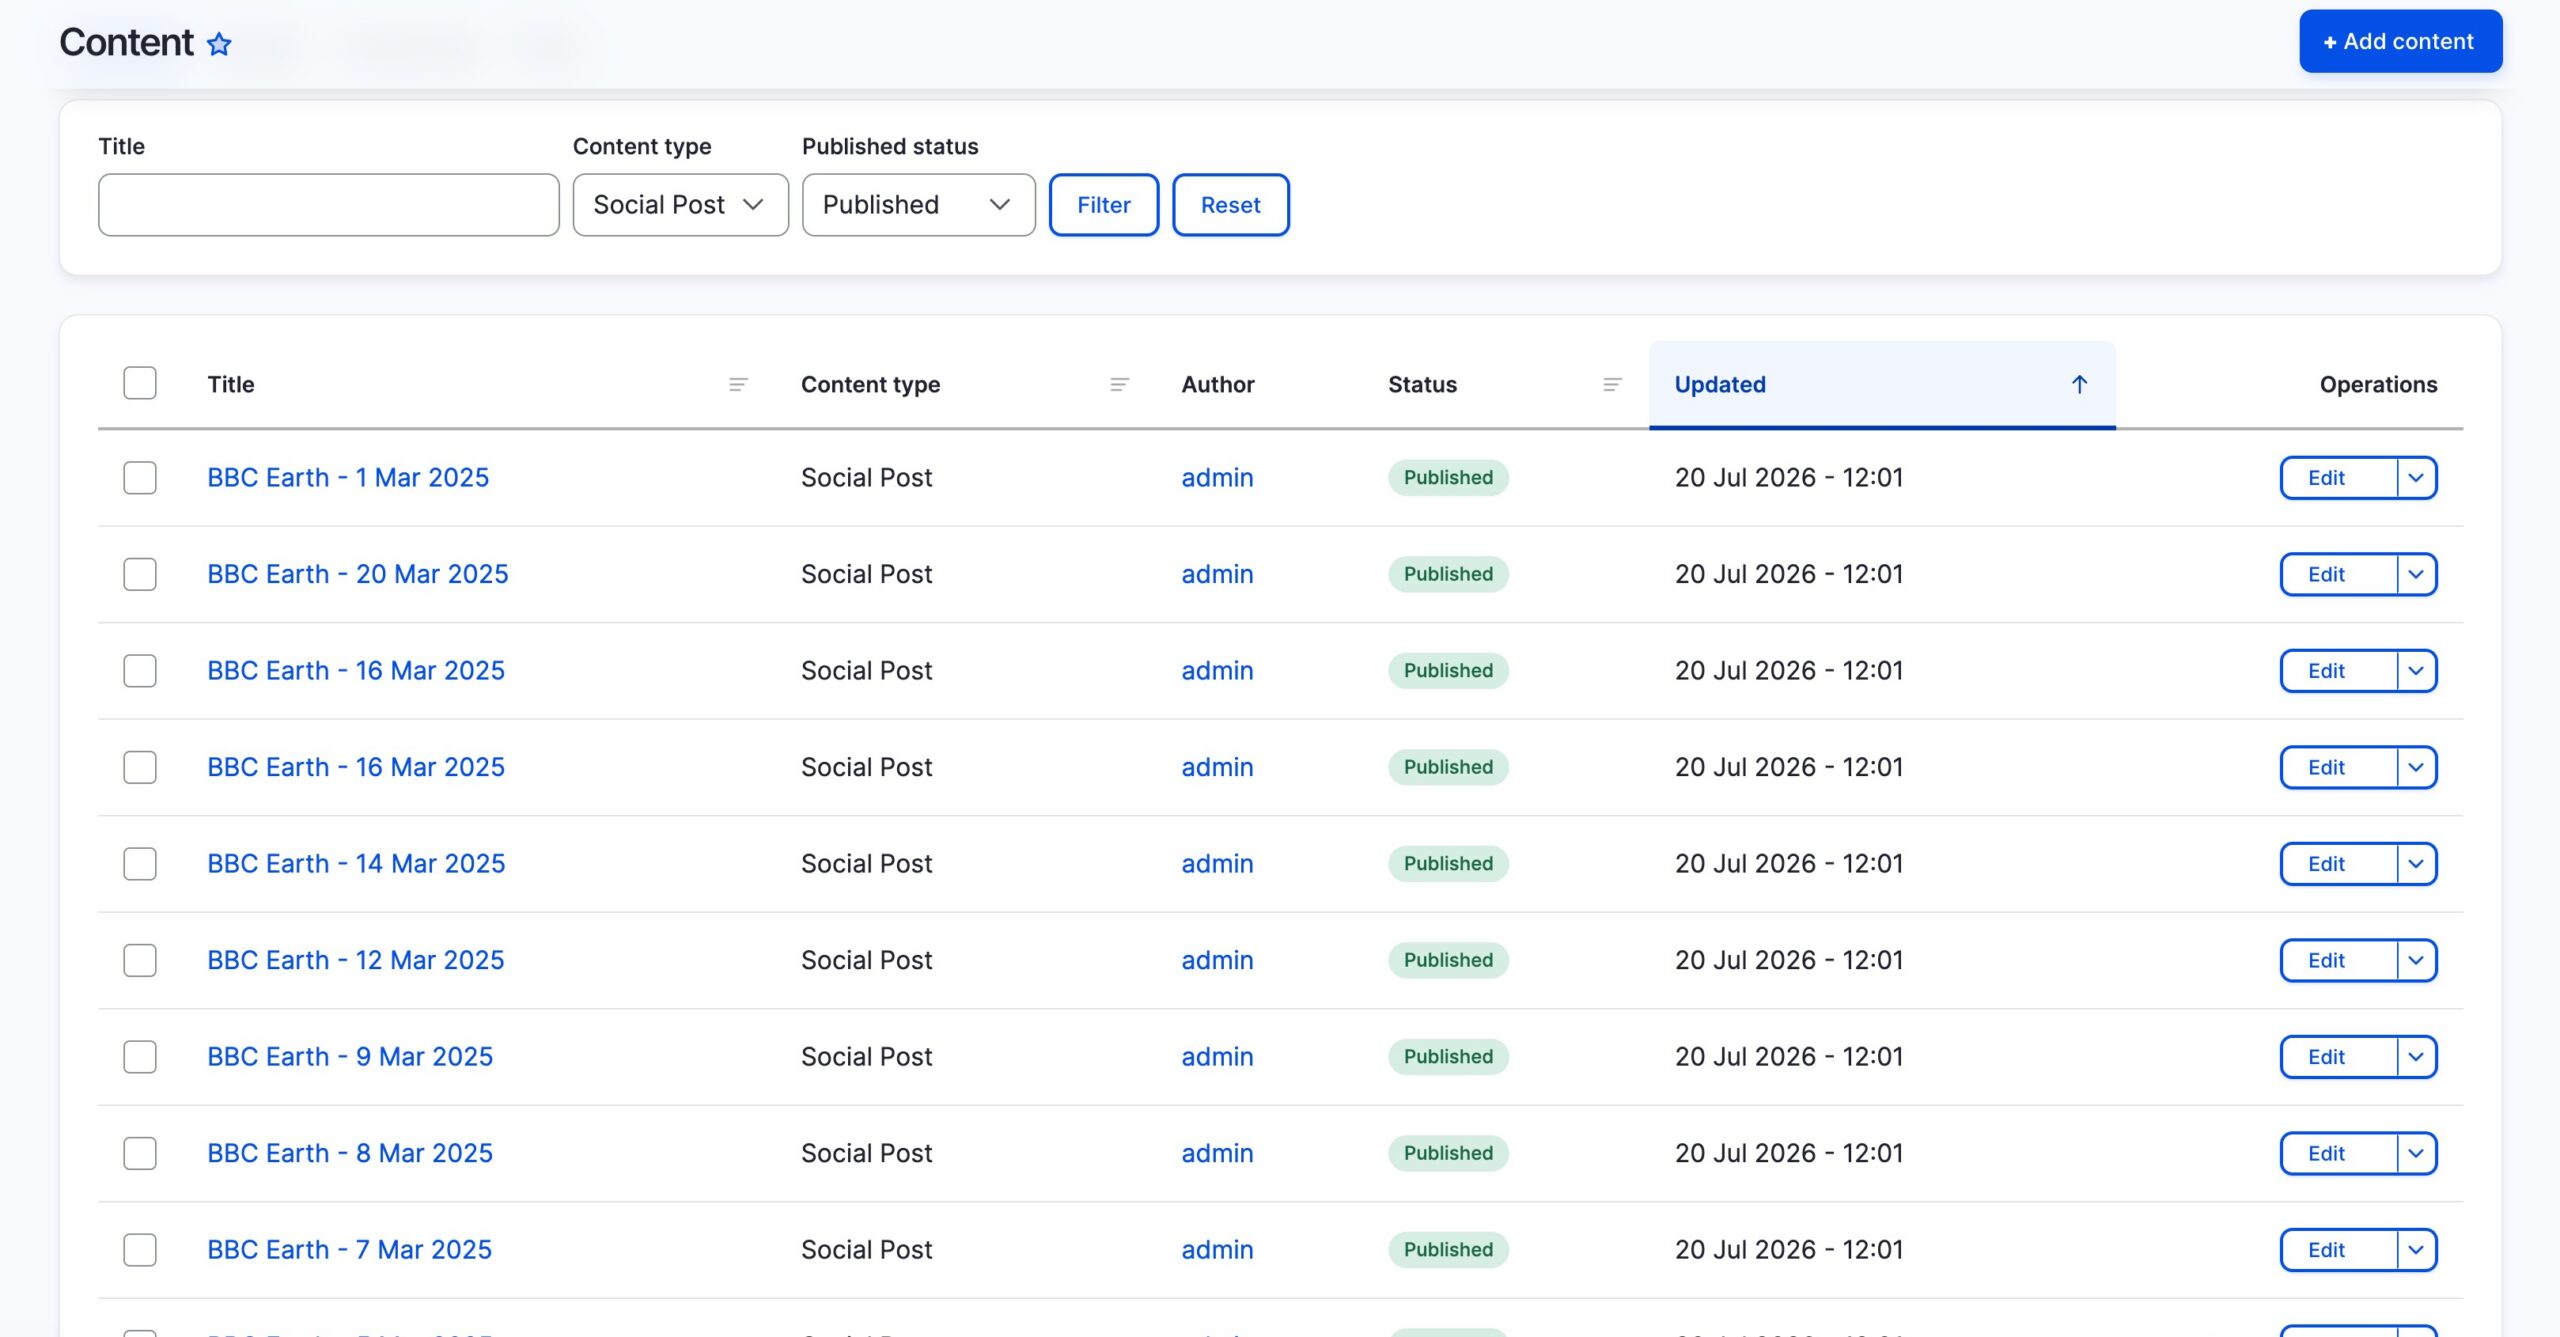
Title → set by the sync to “BBC Earth – 22 May 2026” – nodes must have one anyway
Body → the post’s message. v1 hands this over as plain text, so we store it with the Restricted HTML format and let Drupal do the formatting: filter_autop rebuilds the paragraphs and filter_url turns the bare t.co URLs back into links on output
Authored on (created) → set to the post’s original X publish time, so date sorting and display need zero extra fields
If your content type is missing Body, attach it programmatically:
All sync logic lives in one autowired service. It pages through the API, keeps only X posts, and upserts by field_external_id – new tweets become nodes, existing ones are updated only when something actually changed (likes, comments, text, image) – in short, everything else is untouched.
The service reads two things from its environment: JUICER_API_KEY, the Bearer token from Part 1, and JUICER_FEED_ID, the numeric feed id. Both are required. As a result, the service throws when either is missing – an absent key would otherwise look exactly like a feed with no posts, and the sync would quietly report zero rather than telling you it was never authenticated. Keep the key out of the repo: on the demo site it lives only in the container’s env file.
web/modules/custom/social_post_sync/src/SocialPostSyncService.php – the core of it:
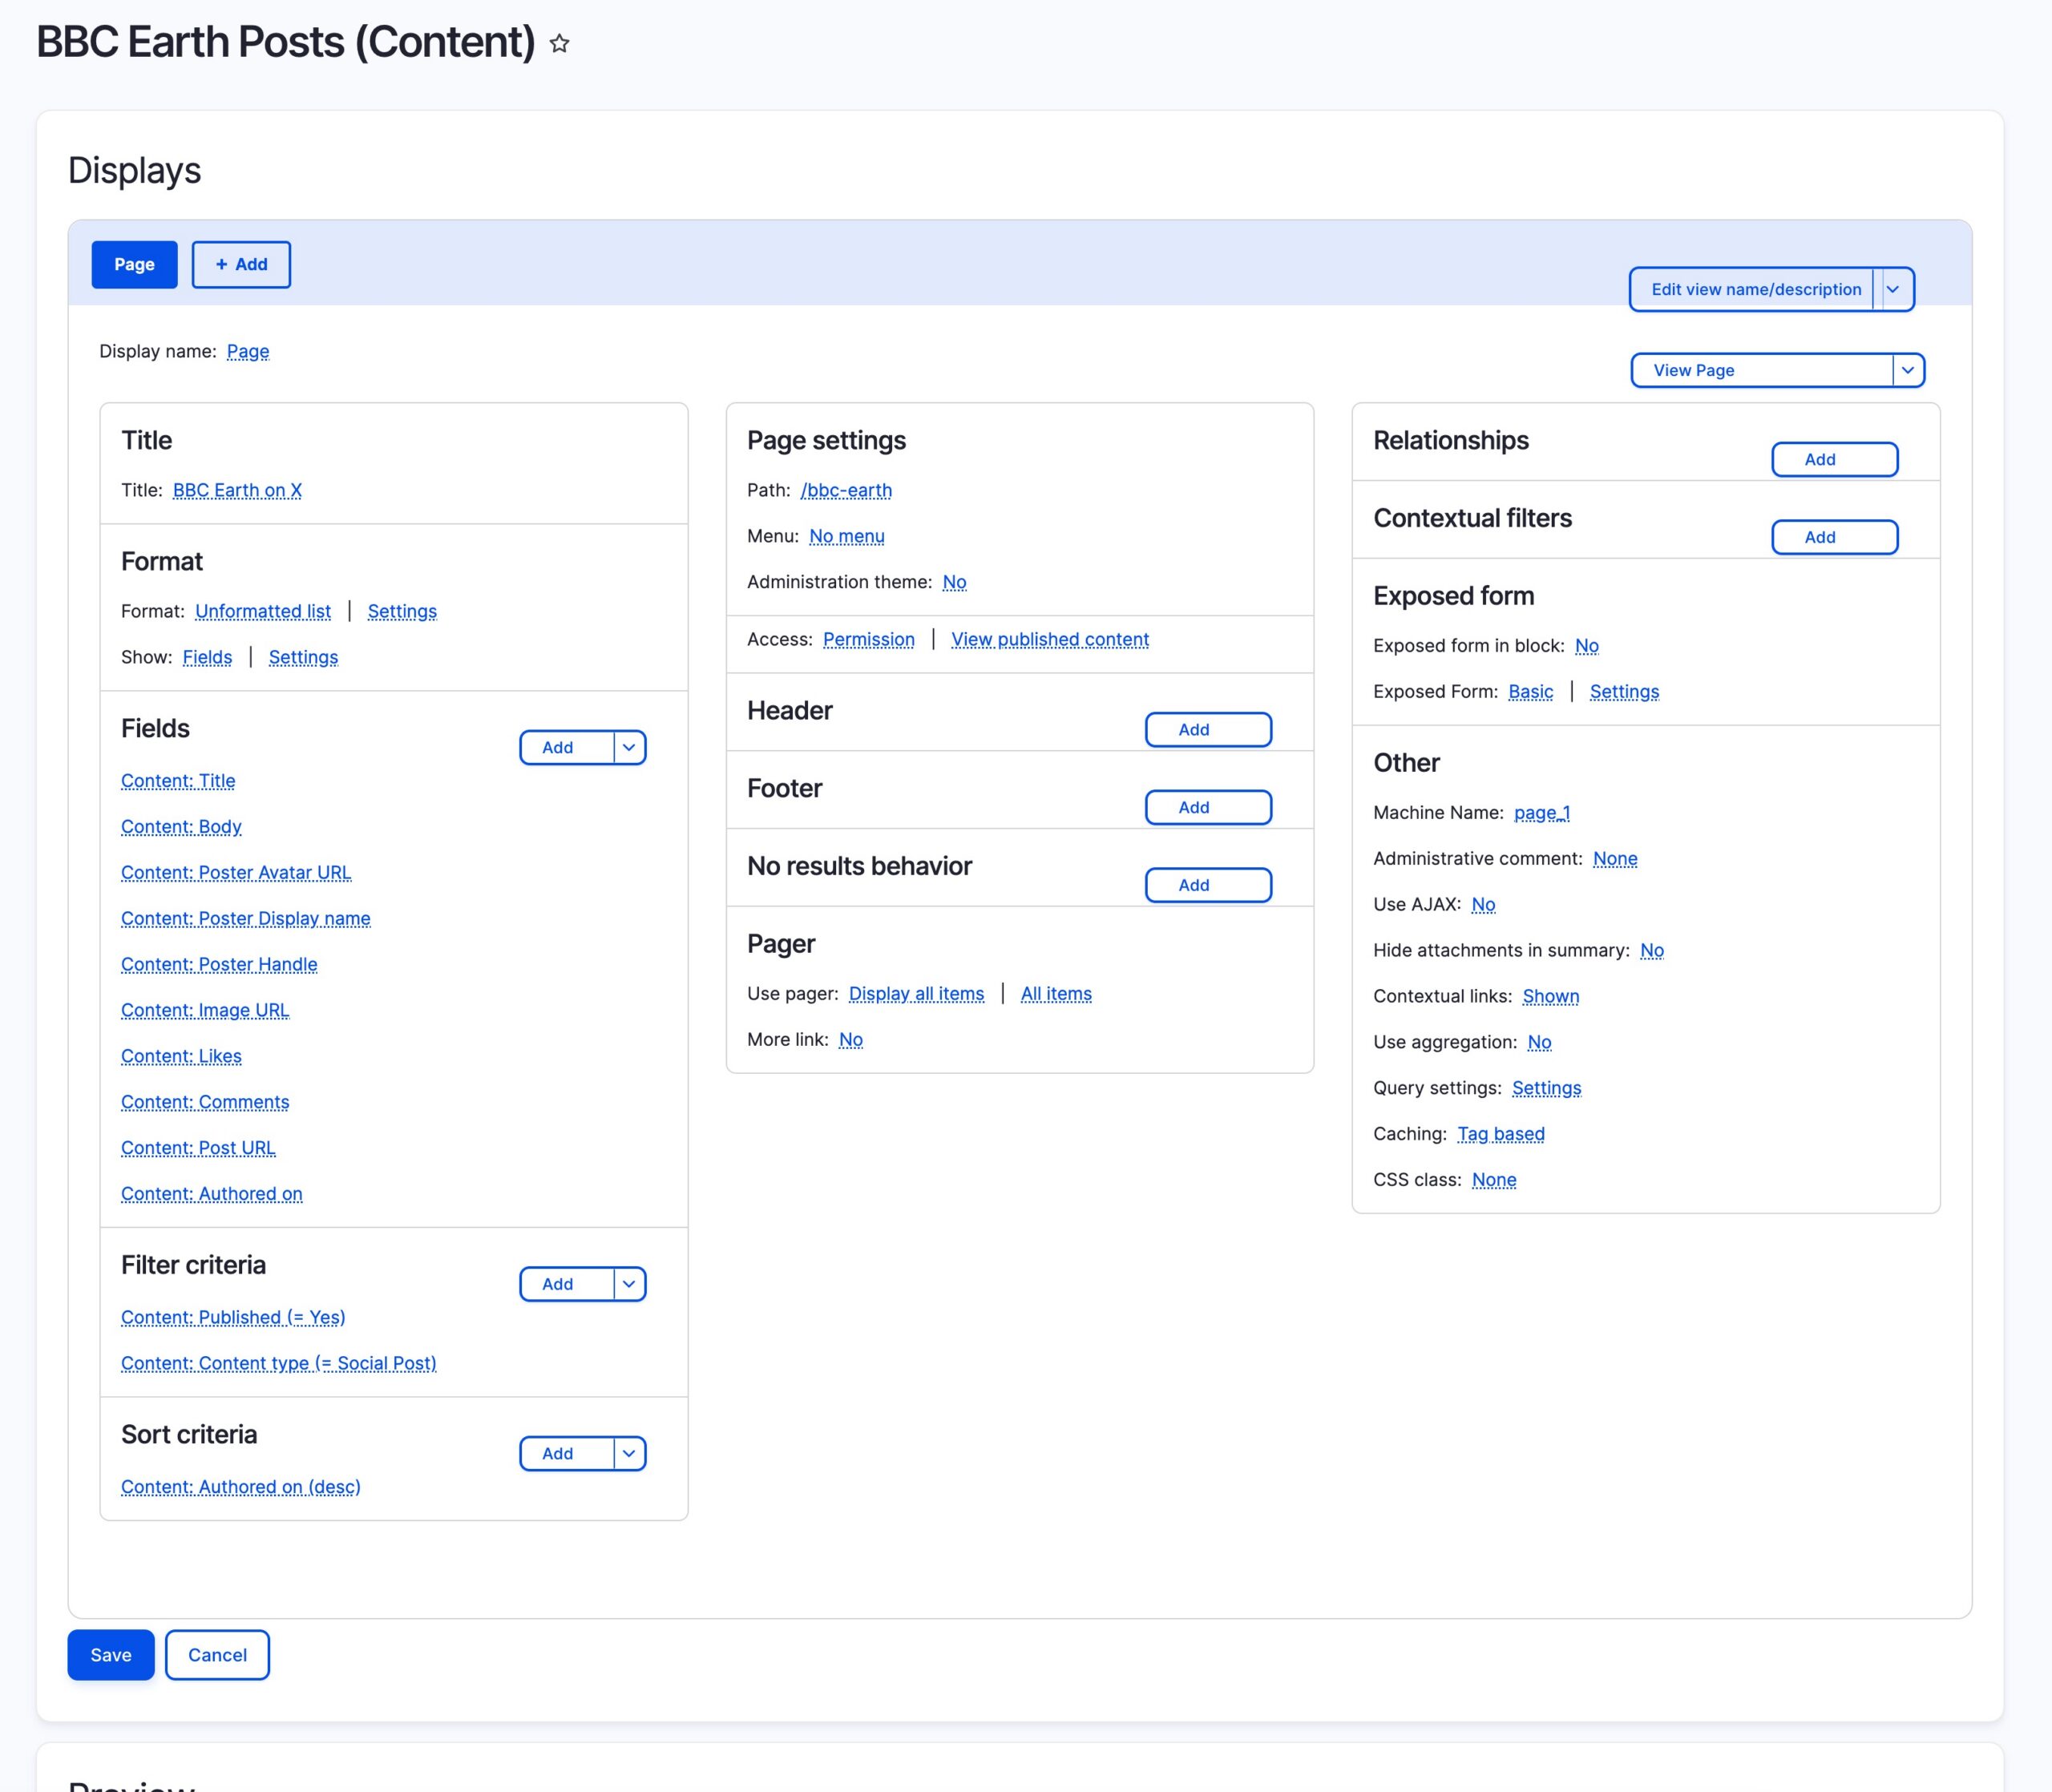
Structure -> Views -> Add view: show Content, create a page – e.g. at /bbc-earth – then adjust:
Filter on the bundle! The wizard can leave this out – add Content type = Social Post or the page will happily list your Basic pages too.
Row style: Fields, not rendered entity – the card template needs individual values.
Add the fields: Body, Post URL, Image URL, Poster name, Poster handle, Poster avatar URL, Likes, Comments, Authored on.
Sort: newest first on Authored on – which is the X publish time thanks to Part 3.
Pager: your call; we show all.
Part 6 – Making it beautiful
An Olivero subtheme carries the whole design – no page builder, no build step, ~700 lines of plain CSS across three files, two small JS files and two Twig overrides:
web/themes/custom/juicer_social/
├── juicer_social.info.yml          # base theme + regions + global library
├── juicer_social.libraries.yml     # social-cards, site-header, post-reel
├── logo-juicer-drupal-v2.svg       # Juicer mark + Drupal drop lockup
├── css/
│   ├── social-cards.css            # the card grid
│   ├── site-header.css             # Juicer chrome: header, nav, footer
│   └── post-reel.css               # the full-screen post viewer
├── js/
│   ├── post-reel.js                # post viewer behaviour
│   └── post-links.js               # in-post links open in a new tab
└── templates/
    ├── views-view-unformatted--bbc-earth-posts.html.twig   # grid + viewer dialog
    └── views-view-fields--bbc-earth-posts.html.twig        # one card
The grid wrapper attaches the library, renders an eyebrow line, and features the newest post at double width:
{{ attach_library('juicer_social/social-cards') }}
<div class="bbc-earth-canopy">
<p class="bbc-earth-canopy__eyebrow">@BBCEarth · {{ rows|length }} posts · synced from the Juicer API</p>
<ul class="social-card-grid">
{% for row in rows %}
<li class="social-card{{ loop.first ? ' social-card--featured' }}">{{ row.content }}</li>
{% endfor %}
</ul>
</div>
The card template reads raw values straight off the row’s entity – cleaner than fighting field formatters:
{% set post = row._entity %}
<article class="social-card__inner">
{% if post.field_image_url.uri %}
{# Opens the post viewer; the footer link is the only route off-site. #}
<button type="button" class="social-card__media social-card__open"
aria-label="Open post from {{ posted|date('j M Y') }} in the post viewer">
<img src="{{ post.field_image_url.uri }}" alt="" loading="lazy">
</button>
{% endif %}
...
<footer class="social-card__meta">
<time datetime="{{ post.created.value|date('Y-m-d') }}">{{ post.created.value|date('j M Y') }}</time>
<span><span aria-hidden="true">♥</span> {{ post.field_likes.value }}<span class="visually-hidden"> likes</span></span>
<a href="{{ post.field_post_url.uri }}" target="_blank" rel="noopener noreferrer">
View on X<span class="visually-hidden">, post from {{ posted|date('j M Y') }}, opens in a new tab</span> <span aria-hidden="true">↗</span>
</a>
</footer>
</article>
Design notes: dark forest-green panel so the wildlife photography leads; a responsive grid that steps 1 -> 2 -> 3 columns with the newest post spanning two; one amber accent reserved for links; engagement data in a monospace “field log” strip; prefers-reduced-motion respected; visually-hidden labels on the stats for screen readers.
Clicking a post: the viewer
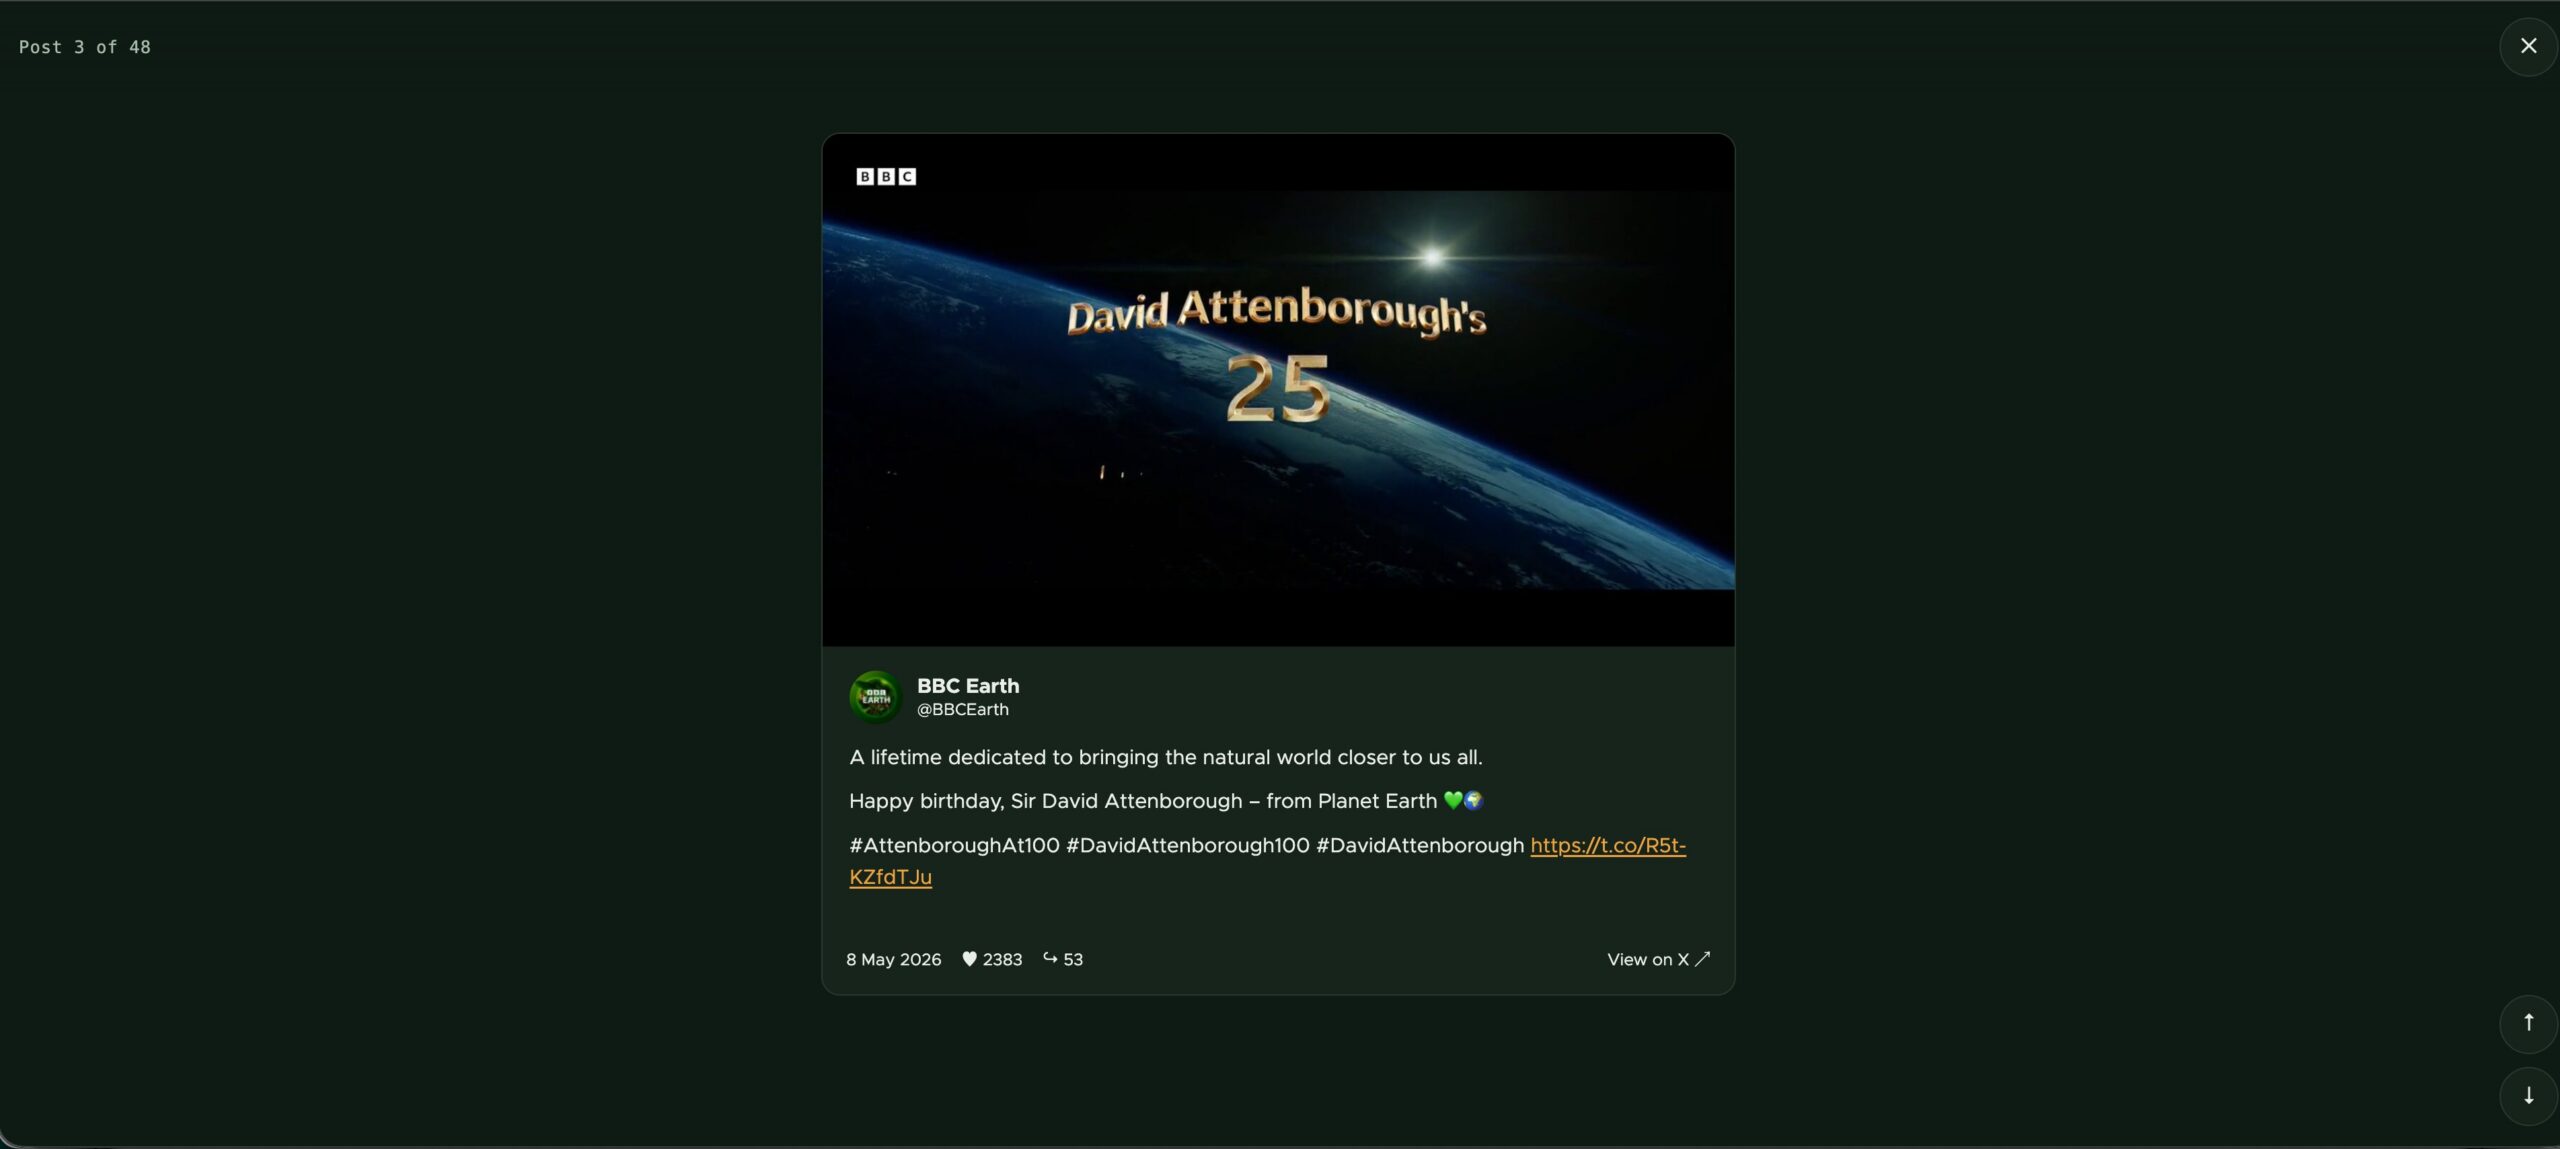
The card image is a <button>, not a link, and it opens every post in a full-screen viewer that snap-scrolls one post per screen – the reading pattern people already know from Reels and Stories. “View on X” in the card footer stays the only route off-site, so browsing the feed no longer dead-ends on someone else’s domain.
Two decisions did most of the work:
A native <dialog>.showModal() gives focus trapping, inertness of the page behind, and Esc-to-close from the browser, so none of that is hand-written. The dialog ships empty in the grid template; only its shell is markup.
The slides are clones of the cards. On first open the JS clones each .social-card__inner, swapping the trigger button back for the bare <img> – inside the viewer the photo is content, not a control. A post is therefore described in exactly one place. This works because the card only visually clamps its message with -webkit-line-clamp; the full text was in the DOM all along.
Finally, the rest is CSS: scroll-snap-type: y mandatory on the track, scroll-snap-align: start on each slide, and object-fit: contain to undo the card’s 3:2 crop so landscape photography is never cut.
Two traps to avoid
Use scroll-snap-align: start, not center. With slides at least a full screen tall, centre alignment lands a neighbour when you jump with scrollIntoView({block: 'start'}).
behavior: 'auto' does not mean instant – it defers to the CSS scroll-behavior, which here is smooth. Home/End across 48 slides crawled through every one and announced each to the aria-live counter. Multi-slide jumps need 'instant'; only single steps should animate.
Also, keyboard parity comes free of the pattern: arrows, PageUp/PageDown and Home/End move between posts, Esc closes and returns focus to the card image you came from, and previous/next buttons give a single-pointer alternative to swiping.
One related touch, in js/post-links.js: the links inside a post body all lead off-site, so they get target="_blank" and rel="noopener noreferrer" too. That has to happen in JS rather than in the markup, because the body renders through Restricted HTML, whose filter_html only permits <a href hreflang> – a target written into the stored HTML would simply be stripped on output, and widening the filter would let any third-party content set its own target.
A tiny module makes the whole thing self-updating. social_post_sync registers the sync service plus one OOP cron hook – Drupal 11 #[Hook] attribute style:
#[Hook('cron')]
public function cron(): void {
  $last_sync = $this->state->get(self::LAST_SYNC_STATE_KEY, 0);
  if ($this->time->getRequestTime() - $last_sync < self::SYNC_INTERVAL_SECONDS) {
    return;
  }
  $logger = $this->loggerFactory->get('social_post_sync');
  try {
    $result = $this->syncService->sync();
    $logger->info('Juicer sync: @created created, @updated updated, @unchanged unchanged, @skipped skipped.', [...]);
  }
  catch (\Throwable $exception) {
    $logger->error('Juicer sync failed: @message', ['@message' => $exception->getMessage()]);
  }
  // Stamp even on failure so a broken API is retried hourly,
  // not hammered on every cron run.
  $this->state->set(self::LAST_SYNC_STATE_KEY, $this->time->getRequestTime());
}
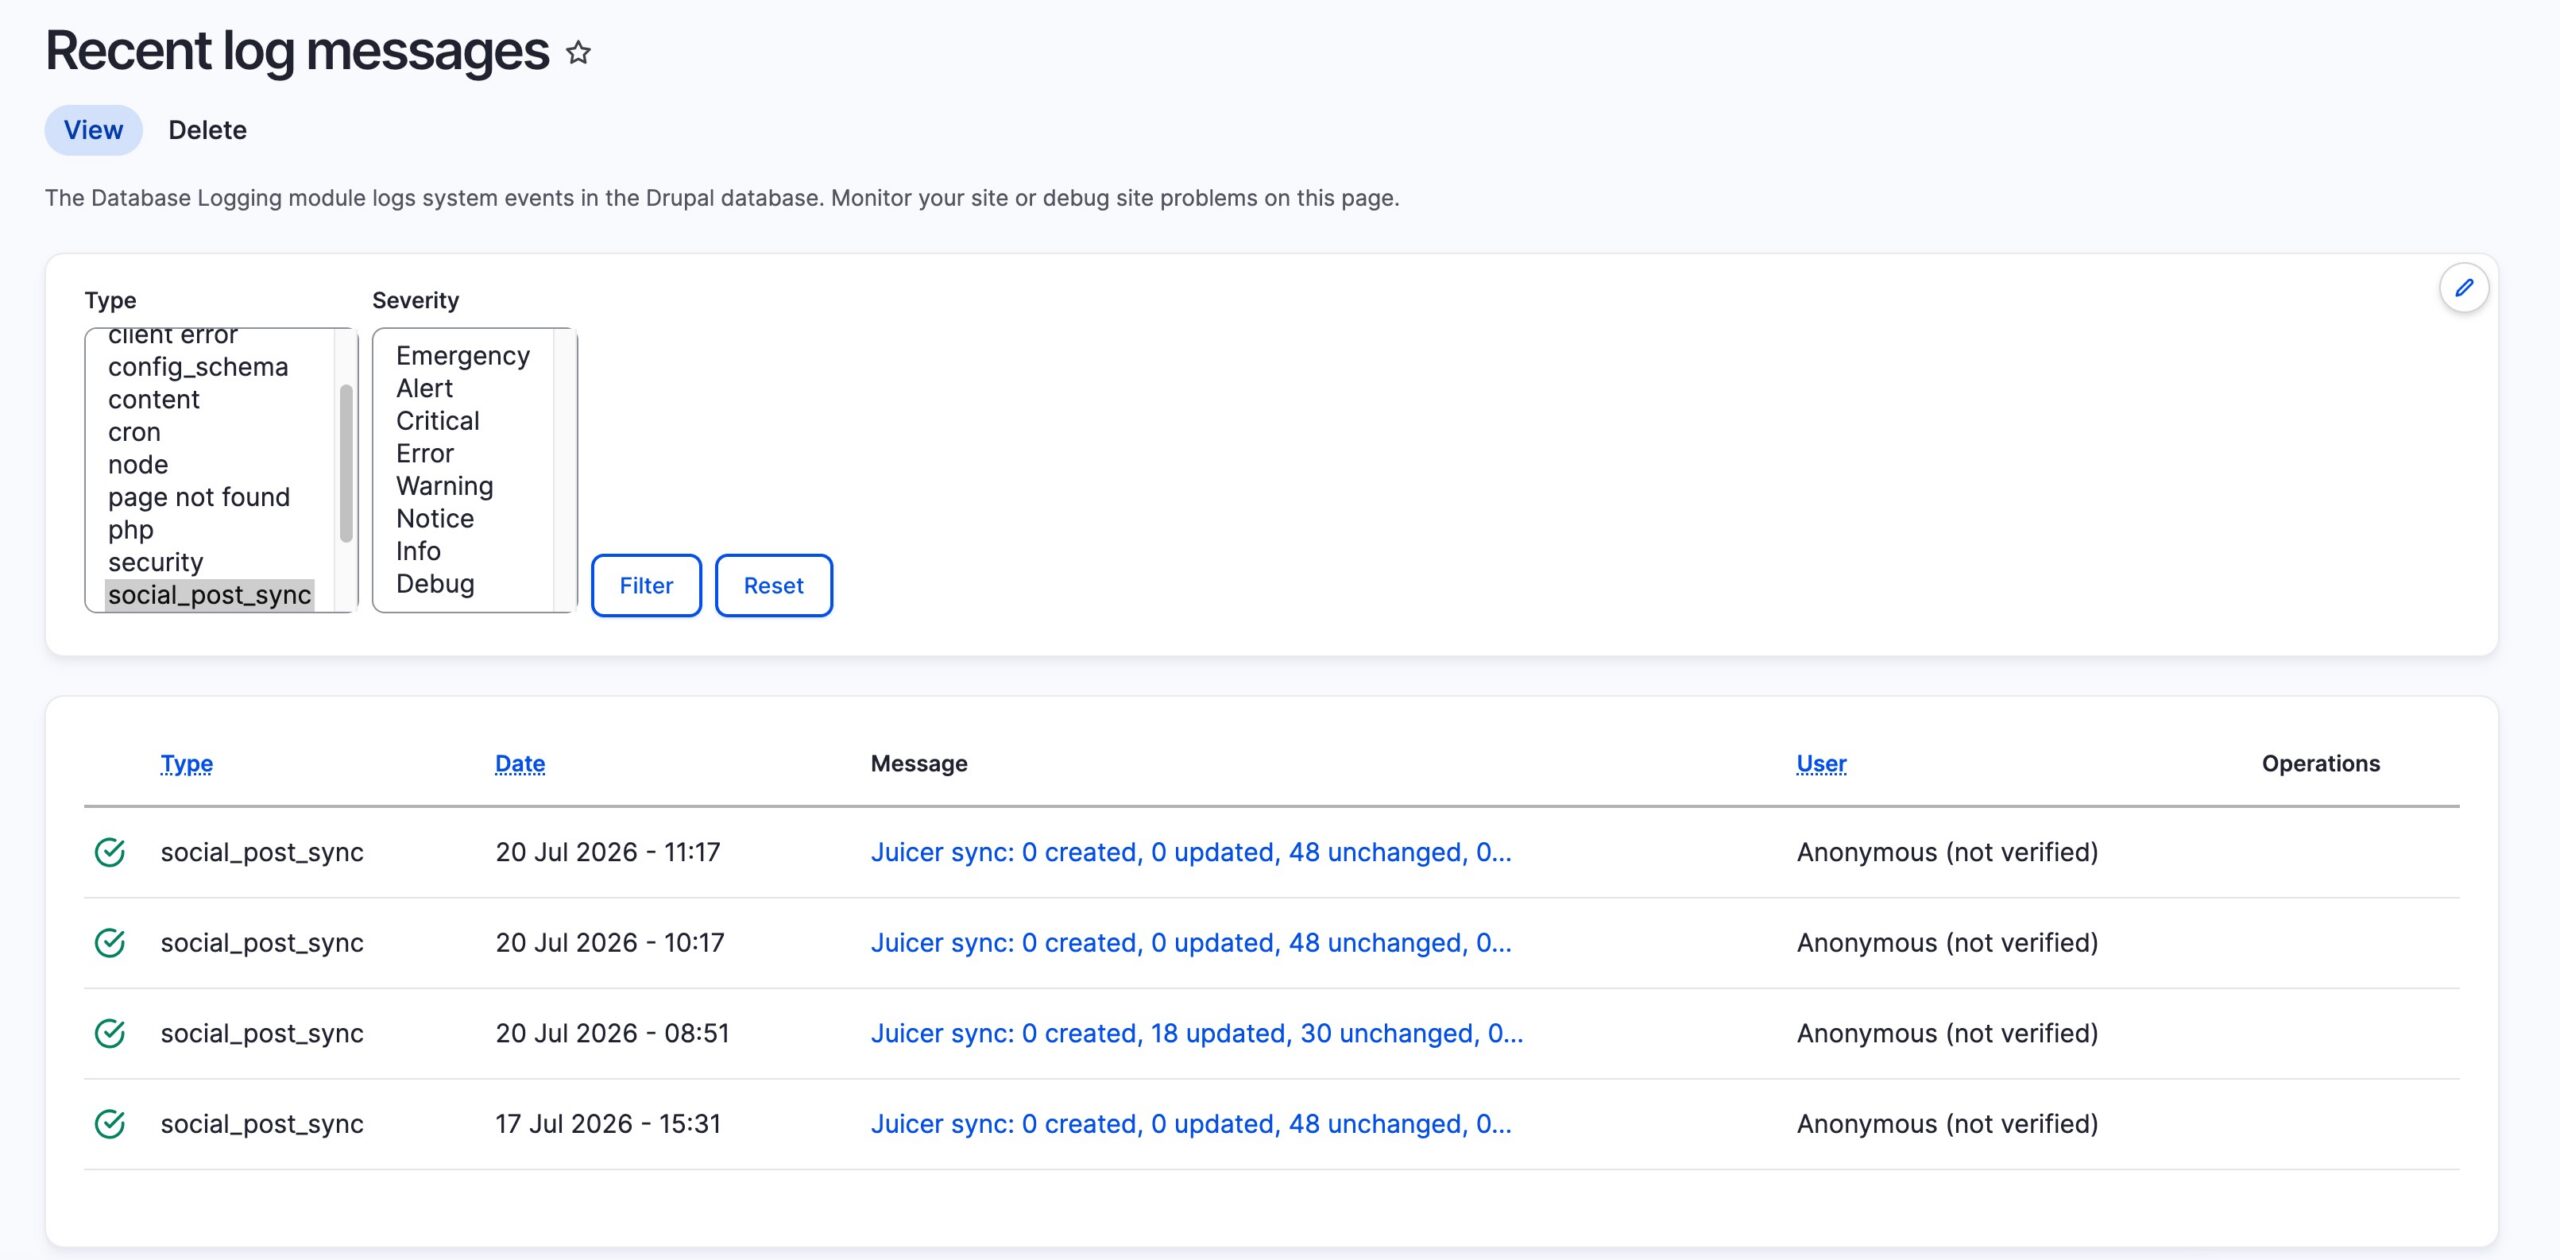
Every Drupal cron run checks a State timestamp; if the last sync is over an hour old it syncs and logs to watchdog. Failures are logged and retried next hour instead of hammering the API.
⚠️
Production note: don’t rely on core’s request-triggered automated_cron – wire real cron (drush cron in crontab, or an external ping of /cron/{key}) so the hourly sync actually happens hourly.
Recap
Layer
Mechanism
Frequency
X → Juicer
Juicer’s own sync workers
The feed’s sync rate – set by plan (daily on Free, hourly on Lite/Starter, every 10 min on Pro), set per feed on Team/Enterprise/Custom
Juicer → Drupal
social_post_sync module on cron
Hourly
Drupal → page
View + cache tags
Instant on new content
In short, zero to hero: one Juicer feed, one API key, one content type, one service, one view, one subtheme, one cron hook.
This guide wires the pipeline up from scratch so you get full control over how posts become Drupal entities. If you just want a social feed on your Drupal site without writing a line of code, we maintain an official module: the Juicer Social Feed module for Drupal 10 and 11.
It drops your Juicer feed onto any page as a configurable block – place it in a sidebar, content region or Layout Builder, filter by network, set post limits, and get a responsive masonry grid with post overlays and a “Load More” pager. It works with Instagram, LinkedIn, Facebook, X (Twitter), TikTok, Bluesky and YouTube, no coding required.