
Juicer takes posts from your various social media accounts and blends them into a feed on your website that refreshes automatically. It’s an easy way to keep the content on your website fresh, as it does all the work of pulling in your social media posts and displaying them for you.
Let’s get started creating and embedding your Juicer social media aggregator!
Creating your first feed
First, visit the Juicer homepage.
A signup form is right at the top. Enter your email address and choose a password. Then click “Sign up for a free account.”

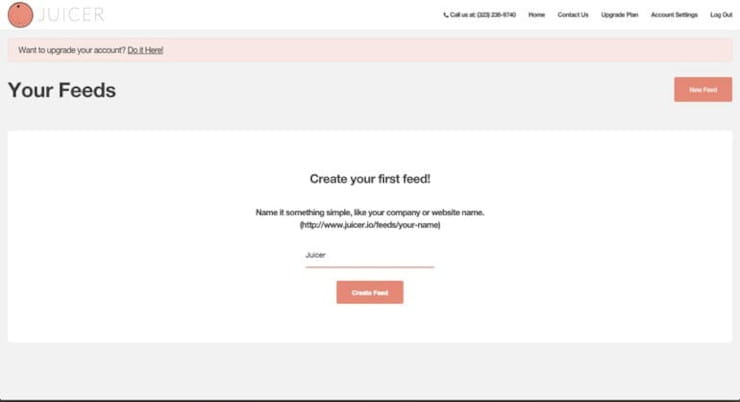
You are now looking at the first step in the feed creation process: naming your feed. Enter a name for your feed in the “Name your feed” area. Choose something that’s relevant for you, whether it’s the name of your business, your own name, or something else related to the content that will be displayed. I’m calling mine “Juicer.” Once you’ve entered a name, click “Create Feed.”
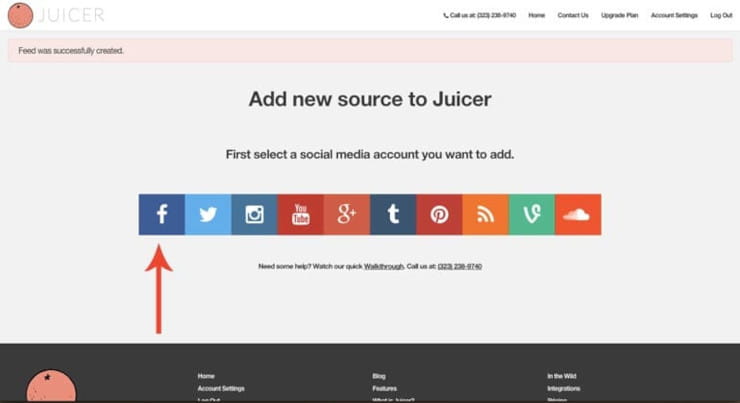
Next, you’ll see a list of social media icons. These are all the types of social accounts that can be added to your feed. I want to add Juicer’s Facebook page as the first social account for my feed, so I’ll click the Facebook icon.
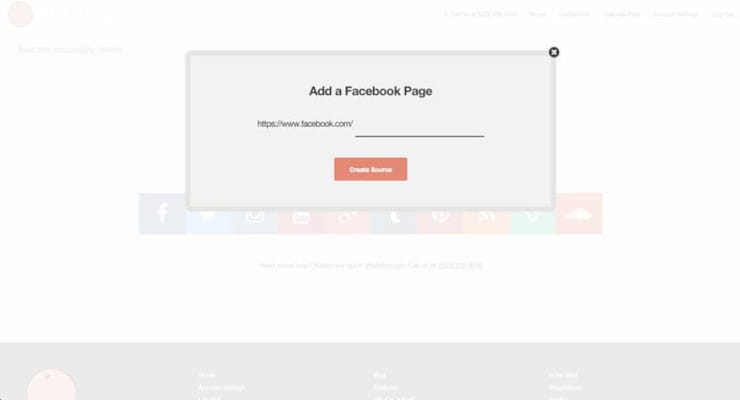
Juicer is now asking me for the URL of my Facebook page.
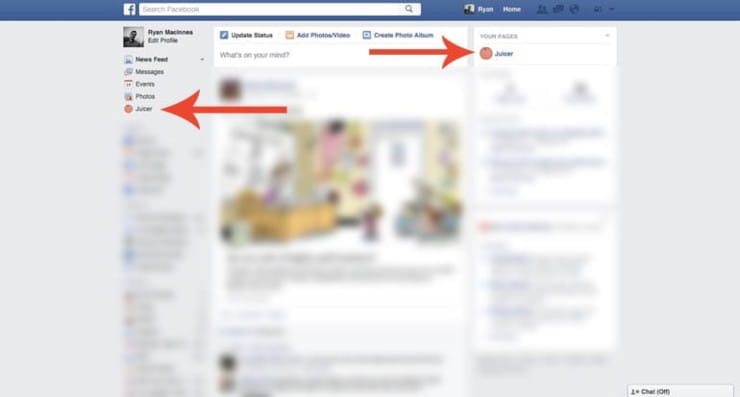
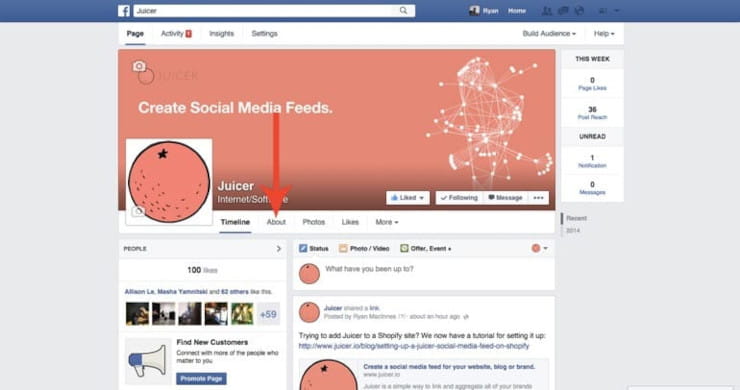
If you’re adding your Facebook page, like I am now, you’ll need to learn the correct URL to plug in (if you don’t know it already). Open a new tab in your browser and log in to Facebook. In the right column, where it says “Your Pages,” you should see a link to your Facebook page, similar to where I’m seeing my Juicer link (displayed in the screenshot below). You’ll see it’s also displayed in the left column. Either one will get you where you need to go.
Once on your Facebook page, click on “About,” right below your cover image, as shown below for my Juicer page.
Scroll down until you see the section marked “Facebook Web Address.” If you’ve already created the web address for your Facebook page, you will see it here.

If you haven’t yet created a Facebook web address, you’ll see a link that says: “Enter Facebook Web Address.”

Click that link and follow the steps it asks of you to create your Facebook web address. Once you have completed them, navigate back to the “About” section of your Facebook page.
Now, you need to copy the part of the URL that comes after the slash in your Facebook page name, which appears like this:facebook.com/YOUR_PAGE_NAME
For example, my “Facebook Web Address” for Juicer is www.facebook.com/juicerio , and I’ll want to copy the juicerio part.
Next, go back to the Juicer site, and paste in that name you copied, like this:
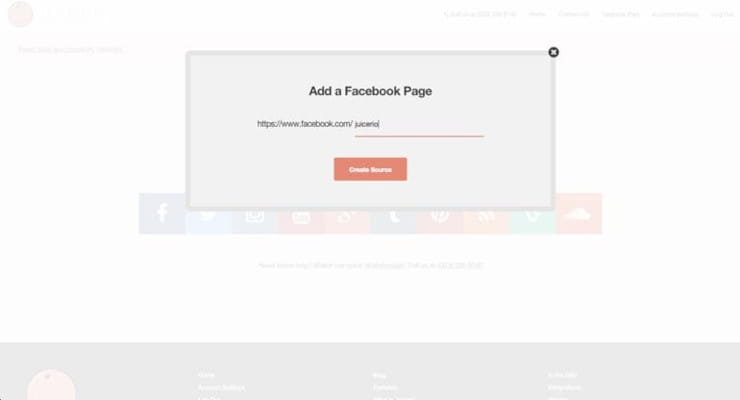
Finally, click “Create Source,” and watch Juicer do its magic. Once it finishes pulling in your posts, you will be taken to your feed editor, and your current Juicer feed will appear, like it does for me here:
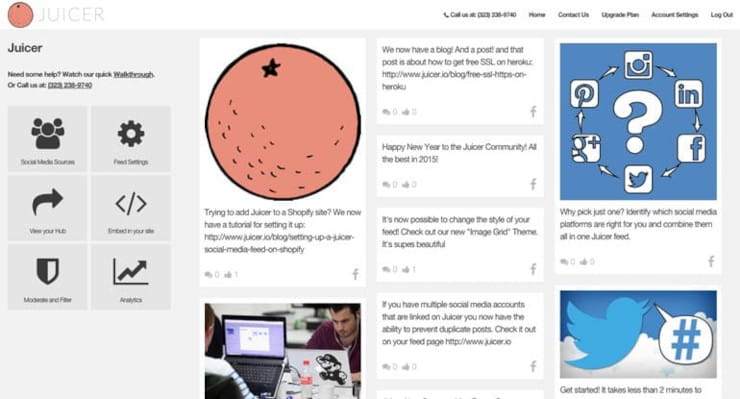
Here in your feed editor, you can customize and edit your feed, with your specific features depending on your subscription level (view our plans). Some features include:
- Add more sources to your feed
- Change your feed settings
- Preview / View your feed (Hub)
- Embed your feed in your site
- Setup filtering and analytics
Additionally, you can hover over a post and click “delete” to remove it from your feed.
Also Check: Examples of different social media feeds
Adding a #hashtag to your feed
Now, we’ll add another social media source to our example feed. One of the great things about Juicer is the ability to add sources from many different social media platforms.
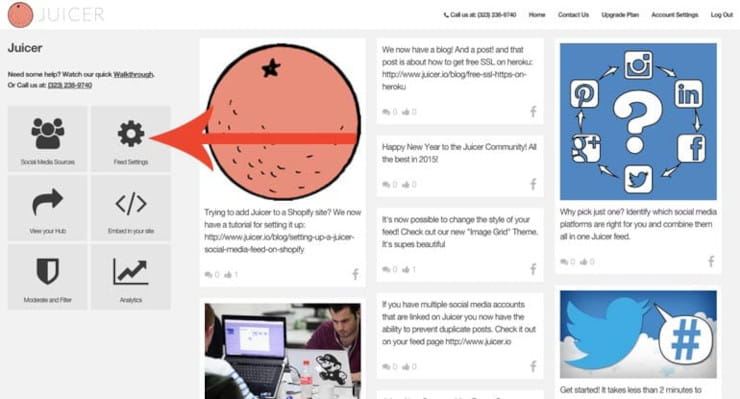
To do this, we’ll click on “Social Media Sources” in the sidebar.

This time, we’ll add a Twitter hashtag, which is a little quicker than adding a Facebook account! We’ll click on the “Twitter” icon. which will open up another overlay.
Before we get any further, notice that at the top of this overlay, there are two buttons labeled “Username” and “Hashtag,” with “Username” highlighted by default.
You can add #hashtags to your Juicer feed from any social media sites that support them (Twitter, Instagram and Tumblr). This way, any time someone creates a post that includes a specific hashtag you’ve entered into Juicer, that post will get pulled into your Juicer feed. Using hashtags, you don’t even need to do the posting yourself to get fresh content on your Juicer feed. This is very useful in a number of ways … whether it’s a promotion for a restaurant or concert venue, a conference/event, a fundraising campaign, etc.
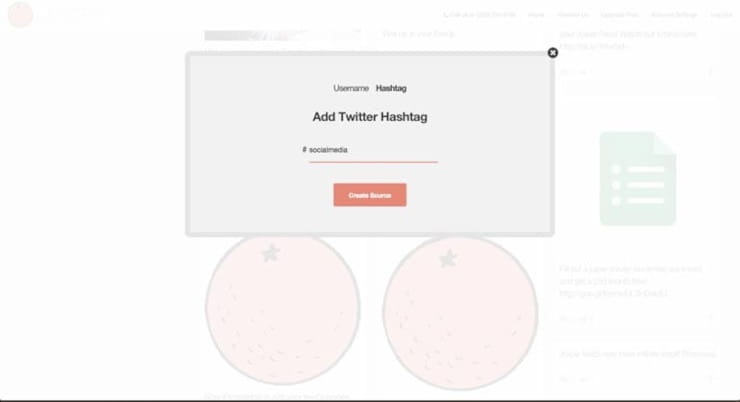
For this example, we’ll add the hashtag #socialmedia to our feed. I’ll click on the hashtag button at the top of the overlay.
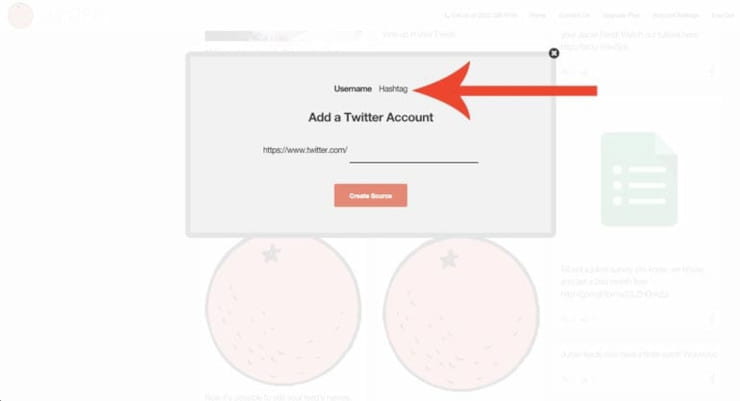
And I enter “socialmedia” into the field, and then click “Create Source.”
Now, our feed contains both posts from the @juicerio Facebook page, and the #socialmedia hashtag from Twitter.
Updating your feed settings
Changing your feed settings is as easy as clicking (you guessed it): “Feed Settings” in the sidebar of your feed editor.
From here, you can do several things to your Juicer feed:
- Change your feed theme. Juicer has different templates for your feed that should fit with just about any site design. Scroll through the drop down and click on all the options to check them out!
- Show only posts with images. If you click this checkbox, only posts that contain images will show up in your feed. Very helpful if you want your feed to be visually interesting.
- Allow duplicate posts. Some businesses like to “link” their Facebook and Twitter accounts. This means that if they post on their Facebook, it will automatically post to Twitter as well. If you have this set up, you may want to uncheck this box so that you don’t see duplicate posts in your Juicer feed.
- Columns If you want to change the number of columns in your feed, do it here. Keep in mind that because the feed is responsive, it will sometimes override this setting so that feeds don’t get too narrow on mobile.
Embedding your feed
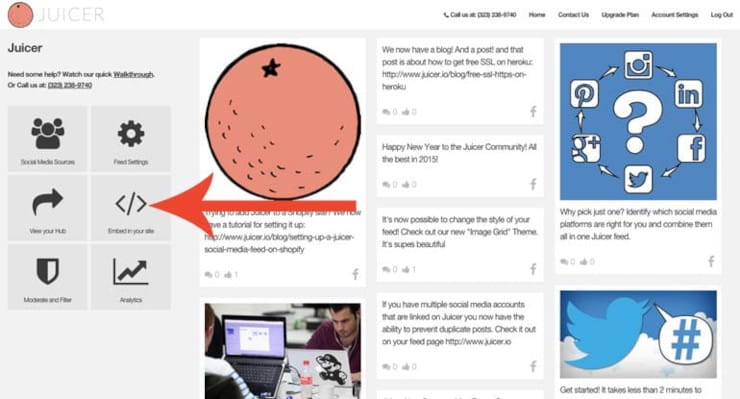
Click the “Embed In Your Site” button in the sidebar of your feed editor page.
Displaying your Juicer feed on your website is as easy as copying and pasting the embed code into the code for your website, wherever you’d like your Juicer feed to appear. Keep in mind, you must have at least one social media account added to your Juicer feed before anything will display on your site.
If you’re using WordPress or Shopify, the relevant plugins and codes are displayed further down in the sidebar.
In Conclusion
As you can see, getting a Juicer feed up and running is deliciously simple. If you have any questions or comments, please contact us!